(Continued from Part 1. This concludes the article.)
In the upper-right corner of the essential tools photo there is a stack of quick grip clamps. In particular, these are Irwin brand heavy-duty models in maximum working lengths between six and twenty-four inches. A couple of these models have head release slides that allow the user to quickly convert the tool from a clamp into a spreader. When it comes to pulling tightly cut framing into position, aligning materials until they can be fastened or holding the end of a long timber while working alone, these clamps can do it. I have jokingly told clients that these clamps in particular are more dependable than most employees. Once you have a set of these clamps, you will wonder how you accomplished anything without them. Of less use but still valuable are spring clamps. These look similar to a giant clothespin and have the same action. Although any quality F-style threaded clamp can achieve greater clamping pressure than the quick grip or spring-style clamps, only the latter styles can be routinely operated one-handed. Thus, when working alone this gives them the advantage in my carpentry tool kit.
Over the years, I have tried every common style of saw horse. Metal horses are strong but heavy, wooden horses are customizable but bulky and the quick-build “kit” saw horses that consist of wooden legs attached to one of several different metal connector pieces are in my experience the worst of both worlds. When hinged plastic horses first became available, I tried out a pair of them but found them to be shaky and weak.
Over time, however, some manufacturers bulked up the spreader mechanisms and hinges while also using heavier-duty plastics and better geometry. My preferred design is one with a full-hinged spreader platform as shown in the photo. They are available in various widths generally in the 24 to 30 inch range. It is true that you cannot support a large weight of materials on plastic horses, so I still have the odd set of metal saw horses for those occasions. For general purpose use though I appreciate these light but solid plastic units.
I have a stereotypical carpenter’s tool belt but it seldom leaves the tool trailer. Most of the time I use a cloth carpenters’ apron and a thick secondary belt with hammer and tape measure holders on it. If you change out the fasteners on a per-job basis to carry only what you need, then you will still have supplies at hand and a second pocket in which you can carry a pencil, utility knife, or chalk box. Speaking of chalk boxes, I prefer models that offer both a push button free spool option for playing out the line and some extent of ratio/geared benefit when winding in the line. Blue and red are the most common chalk colors, but there are a wide range of options. In my experience, blue chalk makes less of a mess nor does it stain materials as badly as red chalk will. When it comes to marking sheet goods such a plywood, a chalk box is ideal.
The last of my floor installation tools is an extension cord. On this project, I used a 100-footer with a triple outlet to bring power onto the site. From there I ran a twenty-five-footer when a given tools cord was too short. My “fleet” if you will, are all 12/3 copper in lengths between 15 and 100 feet. The vast majority of extension cords are 16 or 14 gauge, but pulling heavy electrical loads such as a circular saw or angle grinder can lead to a damaged tool or tripped breakers when using such light gauge cords.
Once the floor system was complete it was time to frame the walls and install the rafters. I used a flat pry bar, also sometimes called a wonder bar, to wedge the wall sections up from the floor to start the raising process. Both four and six foot ladders were used to install the top plates and for setting the rafters in place. Speaking of rafters, layout lines for a pattern were initially obtained using the common rafter scale from the speed square. A framing square (it looks like a capital letter “L”) was then needed to help transfer clear guide marks for cutting to subsequent 2×6’s. After establishing the birds mouth using the circular saw, a jig saw was used to finish cutting out the corner of notch – (the bird’s mouth which is the portion of the rafter that sits atop the wall). A tidy work site is a safer work site so keeping a broom, dustpan and empty bucket on hand for cleanup is a good practice.
The final tools that I consider carpentry essential are tin snips, medium-sized Channel Lock pliers, lineman’s electrical pliers, cat’s paw pry bar, screwdrivers, combination square, caulk gun, and safety glasses. Tin snips were used to cut flashing for the porch band, door threshold and roofing drip edge. The Channel Lock pliers were used to lever twisted studs into position so they could be fastened. The lineman’s pliers were useful for manipulating the flashing as well as in wiring the shed. A cat’s paw pry bar is a shorter, very robust tool designed for pulling sunken nails. Both flat and Philips head screwdrivers were used. I find the No.2 size to be most useful and am very partial to the brand Klein Tools for screwdrivers and electrical tools in general. The combination square consists of a grooved metal rule, typically 12 inches long and a sliding but lockable head that registers in the groove of the rule. The adjustability of depth on this type of square makes it useful for closed-in work such as when siding has been installed but a square line is needed on the supporting framing. The caulk gun was used to apply construction adhesive for the flooring and for sealant behind the door and window securing flanges. Safety glasses and earplugs round out the essentials portion of this list.
Beneficial tools
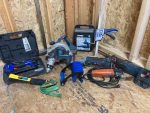
 I classify this next group of tools as beneficial because they make carpentry easier, but not having any or all of them would not stop the building progress. As the photo shows there is a second circular saw, this one cordless. Having a second saw one can set and leave beveled is convenient when framing in gable end walls or cutting hip/valley rafters. Being a battery saw it is easy to work with on the roof or overhangs and lighter since you do not have to support the additional weight and drag of an extension cord. For the keenly observant, note that this is a left-side blade saw, which compliments the electric model from earlier that was right-side bladed.
Excluding the drilling of holes for running wire, the drill was only used twice. It was used to predrill the screw holes in the metal roofing and on occasions, pilot holes were needed for screws installed at odd angles. A drill could have replaced the impact driver for fastener installation, but it is heavier and slower. I recently heard someone suggest that we should be using a clutched drill for installing the metal roofing screws as it could be set to prevent over compression of the weatherproofing washer on those screws.
I have included both an oscillating multitool and a reciprocating saw on the beneficial tools list. On this project the reciprocating saw was equipped with a metal/demolition blade and I had to use it to remove studs from the standing wall when I realized my porch header beam pockets were incorrect. Also referred to as Sawzalls (original Milwaukee Tools branding) these are versatile demolition saws and have been jobsite mainstays for decades. Oscillating multitools are newer on the market but possibly as common now as circular saws. These tools use very thin blades and oscillate in a shallow arc to generate their cutting action. They are easy to control and have a wide selection of blade types, sizes and geometries for a plethora of cutting tasks.
On this project, the corners of our windows were cut from the inside to allow the exact position to be transferred through the siding. I also used the Fein (original manufacturer) to trim off the final sheet of siding on each wall since the siding was run past the corner to achieve the best fit. The final power tool shown is an angle grinder fitted with a flap disc. This was used to remove the burr that formed when the metal roofing was cut to length using the circular saw equipped with a metal cutting blade.
A pneumatic stapler was used to attach the metal soffit vent to the underside of the eaves. The hammer tacker (or slap hammer) was used to hold down the roofing underlayment until the sheet metal was installed. The slap hammer was also used to secure paper-backed insulation in the stud bays.
The final four beneficial tools from this project were a bottle jack, ratchet strap, Kreg panel carrier, and an Irwin quick lift jack. The bottle jack was used to temporarily support the roof while the porch corner post was trimmed to accommodate mounting hardware. A pair of twelve foot ratchet straps served purposes ranging from pulling the framed walls square to supporting suspended timbers until they could be positioned and secured. The quick lift jack is a new to me tool, I don’t know how long they have been available. A pair of them sitting on the ground, spaced three feet apart worked very well to lift the siding into position for nailing.
Lastly, the odd-shaped bright blue contraption in the center of the photo is a panel carrier. Essentially a cam-action clamp with a carry handle, this tool eliminates the need to bend and lift under load when moving sheet goods.
Nice to have tools
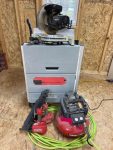
 The tools in this group are exactly as I have labeled them, “nice to have”. In no way are air-nailers with a compressor, a miter saw nor a table saw necessary for basic carpentry. Were it not for my profession I know that I would not have framing nailers or the job site table saw. Woodworking however is one of my hobbies so the miter saw predates my current occupation. In certain situations, the table saw is a safer option than a circular saw, is faster or allows one to make repeatable cuts that a rip guide (described earlier) is too short for. These benefits still don’t make having one for basic carpentry essential. As for the framing nailers, again not necessary – just convenient. I do want to offer one bit of advice for readers who like myself live in rural areas regarding framing nailers.
Select a brand or model for which you can easily acquire nails. When we moved into our community there was a small builders supply and they sold the brand of nailers I selected. It is a quality brand, but not common around here. When the lumber yard went out of business, I became stuck either having to drive over an hour to buy 34-degree nail clips or try to find affordable pricing and shipping online to build up a reserve.
Other tools
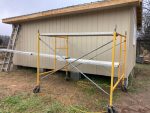
 The “other” tools grouping can be divided into two sub groups, non-carpentry specific tools that were used building our shed and typical carpentry tools that I didn’t actually use for this project. I placed scaffolding, walk boards, and ladder jacks in this group because similar to the framing nailers for a project this small, none of them were absolutely necessary. If your carpentry project was the size of a home, the benefit of rolling scaffold, extendable walk boards and ladder jacks can quickly offset their costs. I suspect that scaffolding and walkboards are familiar to most Survival Blog readers, but ladder jacks may not be. If you look at the far left of the other tools photo, you will notice there is a bracket resting on two of the extension ladder rungs that is itself supporting the end of a walk board. That triangular, adjustable device is a ladder jack. As shown, they are used to convert extension ladders and walk boards into narrow scaffolding. As for extension ladders, having one is almost a necessity for accessing the roof of any structure safely.
Next, the tools I was surprised not to have on site but still believe belong in a carpentry toolkit. I found it surprising that there were no wrenches or sockets out. If I had used sono-tube forms and poured concrete piers instead of stacked concrete block, then wrenches and sockets would have been necessary to install the wedge anchors and bolts that tied wood to concrete. I didn’t pull out a basic handsaw while building the shed. Between the oscillating multitool and a jig saw, using a hand saw has become rare. This said a quality crosscut pattern hand saw is always worth having. If you are in the process of choosing a new hand saw avoid those with thin, finely tapered teeth. They are very “grabby” and the teeth are fragile. I was also surprised that I hadn’t taken out a chisel.
This will sound silly but it is true; using a sharp chisel or just owning a set of quality chisels is a pleasure. Nothing is as frustrating as trying to pare or cut a softwood with a dull chisel. With effort, inexpensive Stanley chisels will take a fine edge and if you maintain the cutting edge routinely instead of letting them get dull then it can surprise you how handy of a tool the chisel is. The absence of a bevel gauge or sliding bevel was my last surprise. This simple tool is used to transfer angles from a corner to your workpiece. It is also used to capture an unknown angle by allowing you to set the gauge against a compass to determine the angle.
Undoubtedly, there are additional tools that belong in this carpentry toolkit list. Hopefully, any omissions fall into the less necessary groupings and I haven’t neglected an obvious essential. For whomever asked the editors for “An article with a realistic and practical list of hand tools and garden tools to keep on hand” I hope my thoughts on carpentry tools is useful. I may try to get my wife to share her thoughts on garden tools with us, she seems to collect them. In closing thank you to the editors and safe building everyone.
Read the full article here

