
In several previous articles on SurvivalBlog.com (Elements of a Security System, Field Intelligence Collection, etc.) several readers and I have discussed the use of various mobile electronic devices to support field operations in a post-disaster world. These can be anything from wireless cameras for security or surveillance to a simple flashlight to see what you’re doing. One common factor among all electronic mobile devices is that they need to be optimally positioned to provide the maximum benefit.
While most devices can be hand-held, having the ability to solidly mount them to some sort of fixed point or surface can allow you to position them as needed or operate them remotely, which can allow you to stay concealed and keep your arm from getting tired over long periods of time. Having used a lot of different devices over the years with different ways to mount them, I decided to develop a compact modular mounting system that could handle pretty much every type of device that I want to use. My criteria for a mounting system were:
- Support for a large number of device types
- Flexible and precise positioning of the mounted device
- Able to handle a wide variety of mounting locations, from sitting on the ground to attached to a brick wall
- Fast mounting and dismounting in case you have to skedaddle in a hurry
- Compact and light
So what do I mean by a ‘large number of device types’? Here are some of the things that I’ve used this system to mount while out in the field:
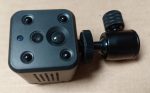
- Wireless camera – I use this during paintball games, when observing wildlife, etc. The device has a built-in WiFi network that you can connect directly to from your phone, and the battery is good for around 2-3 hours of continuous streaming. It also has built-in IR lighting for night viewing and a motion sensor.
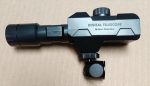
- WiFi telescope camera – Similar to above but provides 70X zoom.
- ATN BlazeSeeker 210 – Another camera with built-in WiFi streaming, but this one provides thermal vision.
- Infrared night vision goggles/scopes – Some of these have built-in WiFi streaming.
- Flashlight – A simple small flashlight that works surprisingly well.
- Flashlight holder – Allows you to mount most tubular devices like flashlights.
- Motion sensor light – Position it so when someone walks by the light turns on. If you place this pointing down a trail at head height at night you can temporarily blind anyone approaching, which can give you a tactical advantage if you need one. Note that I popped the globular light out of the mount, cut down the rounded back and glued a flat circular piece of plastic on it to reduce the size and weight.
- Infrared light – If you’re using infrared night vision but don’t want to advertise your position to other IR users by using the device’s built-in illuminator you can mount this to cover the area you want to watch.
- Motion sensor alarm – Point it down a trail or at a door to set off a very loud alarm if anyone walks by.
- Cell phone camera mount – For holding your cell phone while you’re doing something else.
- Optics digital eyepiece – If you have an existing optical device like a monocular, this can mount over the eyepiece and stream the view via WiFi.
- Game camera – Useful for monitoring trails over a long period of time.
One thing that many of these devices have in common is that they have a 1/4”-20 screw mount built in, which is designed to allow the device to be attached to something like a tripod. This type of mount was originally designed for mounting cameras to stands, tripods, etc., but is now widely included in many devices that need an option to be mounted.
For the devices that don’t have such a mount built in, it’s easy enough to add one. For example, the first camera in the list above doesn’t have a built-in mount, so I simply attached a 1/4”-20 nut to the bottom using J.B. Weld plastic epoxy. Here’s a picture:
It’s not the prettiest glue job, but it works and it’s extremely strong. Depending on the size and shape of the device you want to mount there are also stick-on pads with a 1/4”-20 female nut built in. There are also a lot of different types of mount and clips with a 1/4”-20 screw thread built in, so you should be able to figure out a way to mount pretty much any type of mobile device you might need.
Mount Up
My complete mounting system consists of a couple of components:
While the basic mounting method provides pretty good flexibility in regards to how the device is positioned, having the ability to fine tune the device’s orientation is critical to getting the best use out of it. To provide a fine positioning capability I use a mini swivel ball mount that can rotate horizontally 360 degrees and vertically 90 degrees. I got the all-black model since I wanted to limit the amount of shiny metal to reduce the chance it it being noticed. The device or device holder is attached to the end of the swivel mount and the screw tightened to hold it in position. Here’s a picture of the swivel mount attached to a camera:
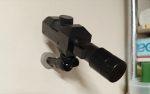
There is one issue I encountered with the swivel mount on some types of devices – if you want to mount a long device perpendicular to a vertical surface the base of the swivel mount doesn’t extend far enough. Here’s a picture to illustrate the problem:
With this configuration you’d have to tilt the camera almost all of the way forward for the base of the swivel mount to be flush with the mounting surface. To address this I included an extension rod in my kit like this:

1/4″-20 extension rods come in a variety of lengths – you can find one that works for your longest device by searching the web for: “1/4″-20 camera extension rod”.
Now for the actual mounts – I have two different methods that provide a lot of flexibility in where I can mount devices – a magnet system and a flexible gooseneck mount. The magnet system utilizes a magnet that screws into the 1/4”-20 hole at the base of the swivel mount or extension rod so that you can attach the device to any ferrous metal surface.
Of course, if you’re out in the wild, there probably aren’t many metal surfaces, so I also include some metal mounting plates. The plates are 1 ½” diameter round(ish) pieces of thin galvanized metal that come in two flavors – one with a dimpled hole in the middle that can be screwed to any soft surface such as a tree trunk, drywall wall, etc. and one with a piece of 3M heavy-duty double stick tape on the back that can be stuck to most reasonably smooth surfaces. Note that the adhesive ones use heavy-duty double-sided tape, which can work on a lot of different surfaces, but they tend to hold best is you give the tape a few minutes to set up before attaching your device. I carry several of each variety with me as part of the kit. The picture below shows the two types of mounting plates.
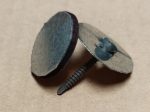
The dimple in the screw-mount plate is to ensure that the top of the screw is flush with the metal plate surface so that the magnet has surface contact with the entire plate, not just the screw head. That’s necessary to ensure it gets a solid hold. Here’s an example of a long device with an extension rod and magnet attached to a drywall wall using a screw plate:
Screws tend to not hold very well in drywall unless you hit a stud, so you may be better off using one of the adhesive metal plates in that scenario. And here’s an example of a motion sensor light magnetically attached to a tree:
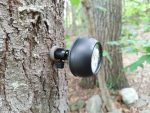
Note that the magnet was originally shiny bare metal, so I painted it a gray-brown color to reduce possible reflections and help it blend in.
The second option for mounting the device is a flexible ‘gooseneck’ mount. These are available in a lot of different lengths, but the one I find most useful is the flexible silicone one around 16” long. Where the magnet/adhesive mounts work well on flat surfaces, the gooseneck can be wrapped around branches, poles, etc., or bent to provide an off-the-ground mount for devices. Here’s a picture of a motion sensor alarm mounted to the gooseneck on the ground:
![]()
And here’s a picture of the same setup mounted on a branch:
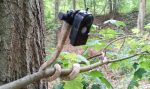
Notice that I wrapped the gooseneck in self-adhesive camouflage tape to make it blend in to the surrounding environment. The tape is available in a lot of different colors and patterns, and it can easily be removed and re-applied for different environments. For camouflaging the devices themselves you can paint them, wrap them in camo tape, put them in a nylon camo bag, cover them with brush, etc.
One other useful application for the gooseneck is as an extension – you can mount a device like a small WiFi camera on the end and hold it up to look over or around a wall or tree or into a window without exposing yourself. If you need a longer extension you can tightly wrap the gooseneck with your mounted device around the end of a long stick and hold that up to give yourself more reach.
Weighing In
The full mounting system with the gooseneck, swivel mount, short extension tube, magnet and a couple of metal mounting plates weighs in at a little less than 8oz. and it’s fairly compact, so it’s easy to add to your kit. How much weight it can handle depends on a lot of factors – for example, the magnet attached to a metal plate on a vertical surface with good surface contact can easily handle several pounds, and the gooseneck can handle a lot more than that. The heaviest item I’ve ever vertically mounted was around 2 pounds, so the system should be able to handle most types of mobile devices easily.
Summary
Mobile electronic devices can provide a lot of capabilities to enhance a wide range of activities such as security, surveillance, night operations, etc., but if you can’t mount and position a device correctly, you won’t be able to extract the maximum benefit from using it. Trying to kludge a mount using paracord, sticks, duct tape or whatever you can find might occasionally yield useful results, but having a flexible mounting system that allows you to quickly and perfectly mount and position a wide range of devices will allow you to extract the maximum value from the devices you carry with you.
Read the full article here