
When we bought our undeveloped land on a lake in Alaska, the first thing built was a little dock on the lake, so that boats and float planes could deliver workers and supplies.
What type of dock is best in a cold climate where lakes and rivers freeze and thaw? In general, I found that Americans writing from states like Minnesota favored light metal docks that you could pull out of the water at the end of the season. We saw that approach frequently used in Wisconsin. From friends there, we have heard that it is something of a seasonal ordeal. Surprisingly, Canadian writers more often described floating docks, without the need to remove them at all. We opted for the latter – a simple, floating dock.
The following are descriptions of three different docks that are in the same weather conditions here. Rather like Goldilocks and the Three Bears, one dock is small and simple, one is large and heavy, and the third is in between.
THE SIMPLEST
The simplest is not even a dock at all. The owners of an occasional-use hunting cabin built a pair of parallel, 30-degree diagonally oriented 4x4s the length of their motorboat. The pieces are separated at a distance to fit under the gunnels of their boat. The wood is topped with slip strips. The low end is at the water’s edge. At the high end is a crossbar with a winch. During their visits, they keep the motorboat tethered to the low end. At the end of hunting season, they just haul their boat out of the water and winch it up on top of this supporting structure. Some years they turn it upside down, but this winter they did not. It filled with snow and drained in spring. How easy is that!
THE BIGGEST
The second dock is big, heavy and long. It, too, is built of wood. Its length protrudes into deeper water, anchored every few yards by firm wooden pillars hammered into the lake floor. The benefit of this traditional design is that it is easier for heavier planes to dock in late summer when the water level drops, and it can support hefty loads.
The surface of the dock lies above high water. This makes sense, except that it renders the slim, permanent support legs vulnerable to ice movement and earthquakes, both of which we experience frequently in Alaska.
Our lake ice gets more than 4 feet thick each winter. It cracks, booms, and heaves in early winter as it thickens.
During “Spring Breakup”, the weather shifts back and forth between warm days and cold nights. The ice breaks during the day and then stitches back together at night, looking like Frankenstein’s facial scars. Water melts first in sunny spots along shore, and along warm, wooden docks. When leads of open water form, wind and waves push the water into cracks and crevices, which helps erode the edges of ice until it cracks into floes of various sizes and thickness. Winds shift back and forth between north and south. In stiff winds and waves, we have seen one floe crash into another, and even thrust up – one on top of the other.
When the ice floes are thick, large, and moving from wind and wave action, they are heavy, strong, and forceful. Docks are vulnerable, but especially large ones with no lake level surface to take the burden. The slim legs (wood or metal) wedged into the lake floor take the full force. Three times in the last decade, some of the dock legs of this long dock have buckled and had to be replaced under the existing dock, which is a time consuming and challenging project, when the water is 33-35 degrees, especially if you are eager for a float plane to deliver long-awaited supplies to that dock as soon as the lake breaks!
Because of the frequency of dock damage from moving ice, what can an owner do? Many years when the ice thins and moves and crashes about in large ice floes, the owner of this dock careens through the open leads for several days in his light metal motor boat to break the ice into smaller pieces to protect his dock’s legs. One year, he hauled out his lake pump to blast the shallow meltwater and the closest ice. My observation is that this is an annual worry for him.
THE MIDDLE DOCK
We use the third “middle-size” dock. It is neither as simple as the first nor as heavily built as the second. It is the middle “just right” of the Goldilocks scenario. This floating dock has been worry-free since 2007. We hauled it out of the water the first year, based on our experience in Wisconsin, but that was a huge bother. We never did it again in the 12 following years.
Dock CONSTRUCTION
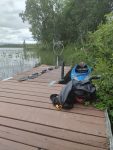
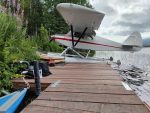
The original section was a modest 8 x 12 ft, floating on empty, plastic water drums. It was adequate for our kayaks and our Piper PA-20 float airplane but also for occasional visits by heavier air taxis, including beavers, despite a water depth of only 3.5 feet at the dock. The annoyance was that we had to keep moving the kayak out of the way whenever we pre-flighted, loaded, or unloaded the plane. I have wanted an extension for some time to avoid this hassle. This was the year. My husband dismantled a dock in a shady area that we rarely visited, and repurposed those 2” thick planks for the frame, top, and a new gangplank.
 Both the original dock and the new extension are designed like catamarans: A wooden frame encloses two floats on either side. Spruce planks lie over the frame, covering the floats. No supports, just open water, lie beneath the middle of the dock. The structure is attached to the lake floor with two round, metal poles encased in slick ABS plastic, each of which has two U clamps positioned at the top and bottom of the 8“ frame. The point of the plastic sleeve is that ice sticks to it less than to metal, and the U clamps allow the dock to rise and drop smoothly with the water and ice. The structure is not attached to the shore at all. It is linked to land by a free and removable wooden gangplank that rests on the soil at its head and on the dock at its foot.
We designed the dock addition to be narrower, so together, the two docks form a fat L shape. To the original 12 ft long x 8 ft wide dock, we added the newer section that is 9 ft long x 5 ft wide. We did so to leave a 3 ft slip on the shore side for our tandem kayak. This new section also has the two metal poles encased in slippery ABS with two U clamps on each one to enable this dock section to rise and fall with the water and ice.
Because we live in a forest, we repurposed an underused spruce deck. We already had 8 free, used 15-gallon water barrels, but one had a bear tooth hole in it. So, my husband stopped by a water vendor and asked what the charge would be for an old, ugly water drum. They charged us $20.
Then, one sunny day, with a smoky fire in the nearby firepit to deter mosquitoes, my husband got to work. He built the dock extension right on top of the existing dock so that it would be easy to slide into the water.
First, he measured the length of 4 water drums lined up end to end. That determined the length of the extension. He then built a frame with three long interior chambers. The two exterior chambers are narrower than the center to hold 4 drums each, with a finger gap on either side for expansion and contraction.
Meanwhile, I opened the bung hole on each drum, drained out any water, and tightly closed the bung hole again.
Because we were using weathered wood, the warping here and there meant that we had to push and shove to screw the corners together with some extra-long lag screws.
On the first day of work, we worried that the floating drums might pop out of the frame when we lowered the dock into the water. So we secured each with a loop of wire to the closest inner board. But frankly, on the second afternoon, we forgot to do so and no problems ensued. Lesson learned.
For the frame, we used 8” wide planks that had supported the prior deck. The diameter of the drums was wider than 8” so they rose above the frame. Since once in the water, it would be just fine if the drums protruded below the bottom of the frame, we just elevated the frame on 4x4s. Thus, the top of the frame lay above the water drums and we could lay the top planks across the frame and secure them in place. This was the fastest part of the job.
Now, how to get it into the water?
Again, worried that the buoyant water drums might “escape” during launch, we slithered ratchet straps under the drums and tightened them up. Maybe this was not necessary, but it worked. If it is the right thing to do, I suggest laying the straps on the surface BEFORE placing the drums, the frame and a heavy walking surface on top! Anyway, then, my husband got into the lake in waders (because our water is cold) and I remained on top of the old dock. I used a 1×4 as a lever to lift and push the far end of the new deck while my husband pulled the front end into the water. Naturally, it got easier and lighter to move as more of it shifted into the water.
Voila! It worked! It did not sink. No water drums escaped.
We removed the ratchet straps. To attach the extension to the old dock, my husband screwed long, flat metal braces on the left and right sides of the top. For extra corner stability, he screwed in galvanized metal L brackets around each corner. Then we added new cleats and a huge carabiner for easy “catch and release” of the kayak/. We called the dog to jump on the bow and enjoyed a lovely afternoon on the water.
The third and final afternoon, we worked on the posts. At first, my husband tried to hammer a 4” metal tube into the lake bed but this was too difficult. He then sank two 2.5” metal poles into the lake on the shore side and end of the dock. (He did not want any pole on the lake facing side where our float plane docks). We enclosed these poles in 3” ABS (sewer strength) pipe. The ice is less likely to stick to the plastic (ABS) than to a metal pole. We then attached two U clamps to the top and bottom of the frame (about 7 inches apart). Each encircles about 2/3 of the circumference of the tube.
The extended dock was terrific, but I saw a pile of leftover wood.
 I asked my husband to build a wider gangplank from the dock to the shore. The prior one was only 20 inches wide and I sometimes felt nervous carrying a heavy load of supplies from the plane uphill to shore. He quickly slapped together a sturdy, 36” wide gangplank which feels much safer to me. The planks are screwed horizontally over a long, narrow frame with two supporting 4x4s underneath in the middle. This will keep the gangplank from bowing under any heavy loads, like 100 lb propane tanks and a new oven.
Project COST
The cost of the new dock was three scant afternoons and about $40 in supplies. for one used water drum and the cost of screws, cleats, and water sealant.
Over the next month or two, we will dismantle, inspect, and either replace or renovate the 2007 dock. We will remove a few top boards along one side so we can inspect the underlying water drums and frame. If all is fine below, we may just replace the top planks. If the parts under water are rotting, then we will need to haul them out and replace them. We know that the water drum in one corner, under the gangplank, is no longer supporting the weight that it used to.
Before the end of the summer, we will learn whether we have a repair or replacement job to do. Either way, the result should last us a decade or more.
—
About the Author: “Mrs. Alaska” and her husband live at a very remote Alaska homestead. She blogs at Alaska Bush Life, Off-Road, Off-Grid, and she is the author of Log Cabin Reflections, available as an E-book on Kindle for $5.) She can be contacted at [email protected]
Read the full article here