
(Continued from Part 1. This concludes the article.)
Here are the steps that I followed in this project:
Figure out how much space is available. Don’t just think in two dimensions (length and width), look up and consider how tall the available space is and what is above it. You are essentially playing a three-dimensional version of the old two-dimensional Tetris game in this exercise, while factoring in the features of your home.
My basement shelving has been constrained by things like water lines, waste lines, propane lines, and HVAC ducts. Consider how wide any aisles between rows of shelves need to be in order for you to get the intended storage containers in and out! I suggest taking the length of your largest container that will be stored on that aisle and adding four to six inches to that length to determine the width of your aisle so that you can maneuver things in and out.
Decide what you want to store on the shelves you are building. It is helpful to use a standardized container size per shelf so that you don’t waste space in any of the three dimensions on the shelf. Standardized depth means that all the containers on every shelf of each shelving unit need to be the same depth in order to be efficient in the depth dimension. Height can vary shelf by shelf within a shelving unit. The containers my shelves are designed for include: 12-gallon clear hinged lid plastic totes; the ubiquitous 27-gallon black plastic totes with yellow lids; 5- and 6-gallon plastic food buckets; and cardboard cases holding six #10 cans of long-term storage foods. Don’t forget the utility of the space under the lowest shelf! For me, that is prime space for ammo cans, a heavy item. I also take advantage of that floor space to store small containers of water, such as two-liter bottles, behind the row of ammo cans. I allocate any excess space to the top shelf for odd-sized items.
Next, make a rough drawing of what you want to build. Include measurements. I think it can be useful to draw your conceptual shelving from both the front perspective the side perspective, and the top perspective. Don’t forget to include the thickness of all of your building materials, including the plywood sheathing for each shelf. Remember that a 2” x 4” stud is not really a 2” x 4”; it is a 1.5” x 3.5”.
Consider using painter’s masking tape to outline the footprints of your conceptual shelves to envision how they will work together and whether your circulation space is reasonable.
Prepare an inventory and budget of all the building materials you will need. Here is the materials list for my project:
Pressure-treated studs to be your base plate on the floor
2” x 4” studs for your uprights
2” x 4” studs for your shelf rails
2” x 4” studs for the shelf supports that will span the space between your rails (The amount you’ll need depends on the gap/spacing you decide to leave between the supports, which you’ll need to assess based on the size and weight of your intended storage items. For the project described in this article, I placed them 18” apart, based on the width of the large storage totes the shelves were intended for. I wanted to have roughly one shelf support stud under each tote. Also, you’ll want to have a support stud under any seams between plywood shelf sheathing if your shelf is going to be longer than 8’.)
Plywood sheathing to serve as the shelf deck (I use the thinnest available) relying on the shelf support studs to bear the weight.
A hex head lag screw for each intersection between an upright and a rail. I like to install them from the interior of the shelves so that they are not visible on the front of the shelves. I used ¼” by 2 ½” lag screws for this project. You could use 3/8” diameter screws if you are putting really heavy things on the shelves.
A washer for each lag screw.
Fasteners to secure the pressure-treated base plate 2” x 4” studs to the concrete floor. I like to use pins that are fired through the stud into the concrete using what is essentially a .22 caliber blank. These take a lot less time than “Redhead” type concrete anchors than you would pre-drill holes into the concrete with a hammer drill for.
Short deck screws or drywall screws to fasten the plywood shelf sheathing to the shelf rail studs and shelf support studs.
Fasteners to attach the shelf supports to the shelf rails. For this project a used metal joist hanger type supports and deck screws. For prior projects, I have either used a framing nail gun at a 45-degree angle through the shelf support stud into the shelf rail stud or 3” deck screws at a 45-degree angle. The nail gun and deck screw options are less expensive than buying joist hangers, which cost $1.38 each at the time of this writing.
Prepare a list of all the tools you will need for the project. Here are the tools I used:
A chop saw for cutting 2” x 4” studs to the correct length
A table saw for cutting the plywood shelf sheathing to the correct width and length (or you can have your hardware/lumber store cut it for you)
A powder-actuated fastener (generically called a Ramset, although there are several brands) to install pins through base plates into the concrete floor (or a hammer drill to install Redhead-type concrete anchors)
A power drill and various bits for pre-drilling holes for lag screws to fasten shelf rails to uprights and to serve as a driver for the deck screws used to fasten the joist hangers for the shelf supports and plywood deck sheathing to the shelf rails and supports.
A level
A ratchet wrench set for installing lag screws. (Tip: get an adapter that will fit in the chuck of your power drill that you can attach the ratchet socket to in order to save time installing the lag screws.)
A tape measure and pencil
A speed square
Clamps to hold your rail 2” x 4”s to your upright 2” x 4”s while you make level adjustments, drill holes for lag screws, and install the lag screws
Now get started building! Here are step-by-step photos of my project:
Photo 1 (above) shows the pressure-treated boards that serve as base plates. They are the foundation of your shelves. Although not shown in the photo, I cut two pieces of scrap plywood as spacers to ensure that the boards were equidistant from each other at the desired depth, and I temporarily attached the scrap boards using metal mending plates to ensure that the boards remained square in relation to each other while I fastened them to the floor using the powder-actuated tool.
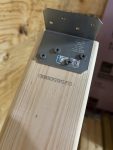
Photo 2 shows the L-shaped bracket installed on the end of a 2” x 4” upright that has already been cut to the desired length for the planned height of the shelves.
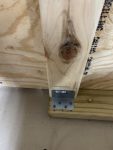
Photo 3 shows a rear upright installed on the base plate. Note that the rear uprights need to be installed on the back half of the back base plate and the front uprights need to be installed on the front half of the front baseplate. In this photo you can also see one of the pins driven through the base plate into the concrete.
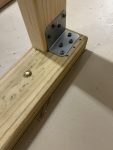
Photo 4 is similar to Photo 3, but shows a front upright, installed.
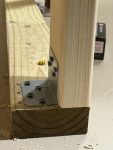
Photo 5 is a closer, side view of a front upright, installed.
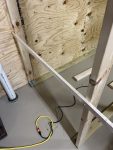
Photo 6 shows a temporary support using a scrap piece of 1” x 2” and screws to hold uprights in place so that I would work solo on this project.
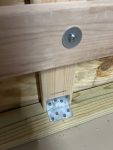
Photo 7 shows the attachment point for a rail on to an upright. Note: I prefer to install the lag screws from the inside of the shelving unit so that they are hidden.
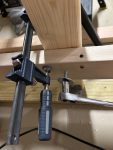
Photo 8 shows a clamp as a temporary support for a rail, with a lag screw in the process of being fastened.
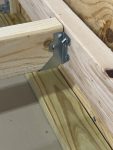
Photo 9 shows how a support board is fastened to a side rail using a joist hanger. This is the first time I have used joist hangers. All of my previous shelves used long deck screws driver at 45-degree angles through the support board into the side rail. I used joist hangers this time because it is faster and easier.
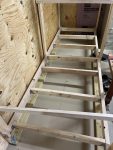
Photo 10 shows the side rails for the lowest shelf installed, with all but one support board in place.
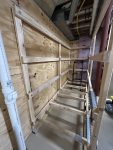
Photo 11 shows the side rails installed for the second and third shelves.
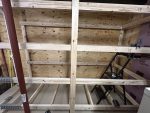
Photo 12 shows the same stage from the front.
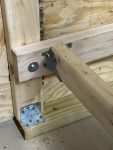
Photo 13 is a close up showing all the types of connections in the project.
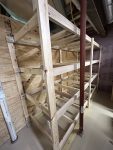
Photo 14 shows the shelf supports nearly complete.

Photo 15 shows installation of the shelf decking in progress. Note the need for a support board under the joint where two sheets of plywood will meet.
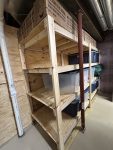
Photo 16 (also placed at the top of this article, in wide format) shows the final product. I use the top shelf for miscellaneous-sized items that aren’t a part of my standard system. In this case, a bunch of newly-arrived cases of MREs fit nicely into the space.
Cost of Home-Made Wood Shelving vs. Factory Steel Shelving
As of this writing, Costco.com is offering Gorilla Rack 72” high by 77” wide by 24” deep units for $299. There is currently a temporary in-store price of $199 at my local store. The description lists a 2,000-pound weight capacity per shelf. These units have four shelves, which includes the top shelf. Some of the shelves are height-adjustable.
For comparison, I put together a budget for an 8’ long, 6’ high, 2’ deep home-made wood shelving unit (see the table below). The budget came out to $204 based on current prices at Lowe’s, not including sales tax which will vary based on where you live. The example wood shelves are a foot and a half longer and a foot and a half taller than the steel shelves and you can build them for 68% of the $299 cost of the normal Costco price. Not to mention the flexibility of being able to build them even deeper, taller, or longer to perfectly fit your storage containers for little additional cost. They will easily hold a similar amount of weight as the steel shelves based on my experience, provided that you use a midpoint upright to support any shelf more than 4’ long. Why did I use 8’ wide shelves for my example? Because building to the standard length of building materials such as plywood avoids waste. Similarly, building shelves 2’ deep allows you to avoid waste and get the decking for two shelves out of a single sheet of plywood.
The cost of the project featured in this article was approximately $350 due to being 10’ long and 42” deep. I could not avoid the cost of plywood waste due to having to slice off nine inches from the side of sheets of plywood for them to fit my shelves, with the scrap being too narrow to be useful for much. The budget for my project also included joist hangers at $1.38 each, vs. the assumption in the budget below that you will just go with the cheaper option of using 3” deck screws or framing nails at a 45-degree angle to attach the shelf supports. You could shave about $20 off the budget below by using Redhead-type concrete anchors instead of the powder-actuated pins.
Making Adjustments to Your Shelving in the Future
The depth and height of your shelves are locked in unless you want to start over from scratch. However, the height of each shelf is easily adjustable in the future. You can also add or subtract the number of shelves if you decide to use shorter or taller containers than you originally planned for. I’ll share two examples.
Some of my previous shelving projects were optimized for the height and depth of the cases of six #10 cans sold by the LDS Church at their Home Storage Centers. These cases were 7 ¼” tall, so I spaced my shelves so as to have 15” of vertical space on each shelf, allowing two cases to be stacked on top of each other with ½” to spare. I discovered a few years ago that they increased the thickness of the cardboard to better survive shipping when they started selling these products online. The height of the cases increased from 7 ¼” to 8 ¼”, so two cases were now 16 ½” tall and would not fit my 15” vertically spaced shelves. Solution: unload the shelves, unscrew the deck screws holding the plywood sheathing in place and remove the sheathing, unscrew the lag screws, adjust the height of the shelving, re-screw the lag screws, re-install the plywood, and refill the shelves. The only downside is that you have to rob space from a higher-level shelf. A tip for executing this change if you are working by yourself is to cut scrap 2” x 4” spacers to the desired height to hold your shelf up while you re-attach the lag screws.
We have another shelving unit that holds a mixture of 12-gallon hinged lid storage totes on the bottom and top two shelves. It had two shelves at a comfortable reaching height for pantry overflow for canned goods. I realized that there was about eight inches of wasted space above the top row of totes and that I would adjust the height of those two top shelves to gain space to add an additional shelf for canned goods. The process was the same as described in the preceding paragraph, but with the additional step of installing new rails, shelf supports, and decking.
Conclusion
Each of our storage situations is different, but we can find ways to improve our capacity and the efficiency we get out of our systems. I wish you all the best in your storage journey.
Read the full article here