
Parkerizing is the trade name of a chemical reaction process that uses a mild acid solution to deliver manganese or zinc to a steel part and thereby coat that part with either manganese or zinc. The generic name for this process is “Phosphate Coating”, but most folks use the familiar name, Parkerizing, and often use a lower-case “p” when writing about it. The purpose of parkerizing is to provide a protective finish on steel parts. The resultant phosphate coating will hold lubricants and rust preventatives. One common use is to coat and protect steel firearms. Compared to bluing, it has a rougher and more porous finish, which helps hold oil on the metal and prevent rust. The finish is a matte finish and non-reflective.
The final finish is not as elegant as bluing can be. Parkerizing, however, has much better resistance to the elements and things like salt spray. It is a very durable finish as well, typically much tougher and better able to resist normal wear and tear than bluing. It is also less expensive and easier to apply than bluing. For these reasons, it is very widely used for military firearms finishing.
Our home version of Parkerizing will give excellent results when done properly. This approach also works well if you are doing many firearms at once. This example will use a minimum of commercial products and substitute thrift store, grocery store, and hardware store items that work adequately in place of commercial products. I would encourage you to research this topic if you have questions.
This is not the only way or the simplest way this work can be done. The process outlined here is intended to give excellent results every time without an expensive professional level commercial setup. In a very simple setup you could use the kitchen sink for the cleaning tank and the stove for the hot water and parkerizing setup, clean the part down to the bare metal by hand, and put the part in the solution.
You can get excellent results with this Spartan setup. However, more often than not, you will get mixed and inconsistent results. This happens because the parts are not taken down to bare metal consistently over the entire surface, all of the original finish is not removed from every nook and cranny of the part, small areas containing contaminants bleed out during the Parkerizing step, temperature control is poor, efficient parts handling is difficult, and the post-parkerizing procedures are not as effective.
Your work area must absolutely be well-ventilated. If you are using a flame of some kind to heat the Parkerizing tanks you must clear any flammable materials from the work area and have a good fire extinguisher on hand. You will be working with pots of hot water and corrosive fluids, so consider what would happen if one of them boils over or is spilled somehow.
One of the main attractions of parkerizing for hobbyists is that it does not require a lot of expensive or sophisticated equipment. For the 1911 being parkerized here you need the parkerizing solution itself, a stainless steel container big enough to hold the largest part you want to parkerize, a stable heat source, a way to clean the parts down to bare metal such as a sandblaster, a way to thoroughly degrease your parts, and a protective oil for after the parts come out of the parkerizing solution. That might sound like a lot just looking at it. But a lot of it is stuff you likely already have or can acquire inexpensively locally. Thrift stores often have stainless steel pots.
Parkerizing only works on clean, plain steel parts. It will not work on stainless steel, brass, or other metals. The steel is media blasted and then submerged in the acid bath at about 190 degrees. This etches the metal suspended in the acid bath into the workpiece.
The process works the same on any steel. Those of you who make jigs and fixtures from steel can parkerize them also. Some knifemakers parkerize carbon steel blades to reduce rusting and corrosion although the surface texture can impede fine slicing on thin blades.
Here is a rough outline of the process:
- Completely disassemble the unloaded firearm.
- Scrub all the parts down in a cleaning solution and then thoroughly scrub them in clean water.
- Media blast the parts.
- Clean the parts again to remove any media dust.
- Rinse the cleaned parts again.
- Suspend the parts in the hot water tank to get them up to temperature.
- Move the parts to the Parkerizing solution and suspend them there for the required time.
- Rinse the parts immediately after removing them from the Parkerizing solution.
- Apply a water-displacing oil to the entire part.
- Apply gun oil to the entire part.
- Inspect and reassemble the firearm.
The firearm that is being parkerized here is interesting. It is a Model 1911 “parts gun”. The pistol has a Brazilian copy of a 1911 slide from an unknown source and was built on an aftermarket frame. A beavertail grip safety was fitted to the frame and the curved area below the trigger guard has been modified. The slide seems to be dimensionally the same as a Colt.
The surface of the slide is covered with small pits that look like it may have been lightly rusted at some point. These pits will be blended in with the media blaster as much as possible but will interfere with the final appearance. In addition, it has been handled roughly over the years and has a lot of small marks and dings in it.
The barrel is a Colt Series 70 that has been fitted to the slide and frame. The remaining parts came from a box of a gunsmith’s accumulated used take-off parts with a few new small parts such as the hammer thrown in. It was built by a well-known gunsmith to be his low-cost dedicated all weather “beater” carry gun. No attempt to improve the cosmetics, however, has been undertaken until now. This work is primarily intended to impede any rusting.
At my friend’s request only the slide, frame, mainspring housing, grip safety, thumb safety, bushing, recoil spring plug, and slide stop will be treated. When an acquaintance remarked that it was just a parts gun, my friend correctly replied that all guns are initially assembled from parts. The difference is that this pistol has been professionally fitted, has a good trigger, good sights, has been very reliable, and has had accuracy work.
Begin your parkerizing by gathering the required supplies and the parkerizing solution itself. You have to choose between the zinc and the manganese solutions. Manganese phosphate and zinc phosphate are similar, but manganese is best as a final finish. Manganese is more wear resistant and typically gives a darker finish than zinc. Zinc is preferred for parts that will be painted, although some prefer it as a final finish due to the lighter gray color. Paint applied over zinc parkerizing is a common combination with FALs and other military rifles.
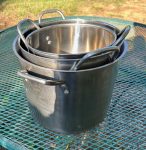 Suitable tanks for parkerizing are not too hard to obtain for a lot of projects. They must be made of stainless steel and must be large enough to hold the parts you want to parkerize. If you want to refinish a handgun, for example, you can do a fine job using a small stainless pot for the actual parkerizing solution. Don’t use your home cooking kitchen pots for this work, get some dedicated tanks or pots.. A stainless steel kitchen pot from a thrift store is a good choice because they are foolproof, they last almost forever, come in various sizes, and are very stable on a heat source. The ones used here are stock pots from a national grocery chain. They were very inexpensive, they have lids, and they nest together to save space. (As shown.)
A rifle will require a much longer stainless steel parkerizing hot tank of course. While not optimal for several reasons I have heard of using a stainless steel drywall pan, for phosphate coating rifle barrels. I use an eclectic mix of found, purchased, and homemade items to parkerize steel. It is relatively easy to find a heat source such as a camping stove
Note that many people make their own parkerizing solution from scratch. In my experience these formulations do not wind up performing any better than the commercial products and often not as well. There are many variations on the homebrew parkerizing formula and the results can be all over the place. They can be dangerous for inexperienced people to formulate. Small quantities of the proper ingredients are hard to find, so the cost can add up.
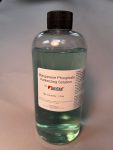 There are a few dependable and readily available commercial manganese based parkerizing products. Here I am using DuraCoat’s Manganese Phosphate Parkerizing Solution. I strongly recommend at least starting out with the commercially offered parkerizing solutions. The DuraCoat Parkerizing solution is very consistent and being pre-mixed it saves me a lot of time. One thing I particularly like about the DuraCoat product is that it meets military spec A-A-59267 for small arms finishing. Be aware that different manufacturers may specify different working temperatures for their products. This manufacturer specifies 180 degrees F. for best results.
Commercial stainless steel tanks for this work are readily available. These tanks are fairly expensive. However if you will be doing very much parkerizing then they are worthwhile. You can buy a rifle-length stainless steel tank and use it for any shorter firearm or steel part. Many times, stainless steel food service pans in various shapes and sizes can be found used and work well.
You cannot use a carbon steel tank for the parkerizing solution because you will wind up parkerizing the inside of the tank where it touches the liquid solution. This will greatly shorten the parkerizing solution’s life and create a lot of unwanted sludge.
As with most firearm finishes, the prep work is often more work than the actual finishing process. Surface preparation is key to a quality finish. Parkerizing will not cover blemishes on the part surface and will highlight every nick and scratch in the metal. Having said that, one way to refinish a firearm that has a lot of surface rust is to medial blast the metal and then parkerize it to make the rust damage stand out less.
Take note that parkerizing adds a fairly thick layer of phosphate coating to the steel. This changes the actual physical size and/or dimensions as well as the texture and chemical structure of the outer layer of the steel parts. Additionally, parkerizing may ruin springs, fine threads, and factory tolerances on steel parts. I recommend that you do not parkerize any springs. Heed this warning before you start parkerizing anything expensive or anything that cannot be replaced.
Completely disassemble the unloaded firearm. If you are Parkerizing a barrel plug on bores and gas ports on them so that you do not parkerize the inside of a barrel. I use the silicone rubber tapered plugs from Brownell’s. They work okay to keep solution out of the barrel.
 The 1911 was taken down to its bare frame. The grip screw bushings were removed as was the ejector. Don’t forget to remove the spring and plungers from the mainspring housing and the plunger tube. At the owner’s request, the plunger tube was not removed from the frame since it is staked in. If you get this request, you should at least check that the part is still tightly staked into the frame. The owner also asked that the front and rear sights on the slide not be removed since he was happy with the zero. I complied with his wishes.
Please note that not completely disassembling a firearm before parkerizing comes with some risk. The parkerizing solution can get trapped in small holes and screw threads. This can result in corrosion and rust that may not manifest itself until the firearm is reassembled.
(To be concluded tomorrow, in Part 2.)
Read the full article here