
(Continued from Part 1. This concludes the article.)
Most of the time the barreled receiver is treated as one part. Normally, a rifle barrel is not removed from the receiver during parkerizing since it is difficult to remove and reinstall without damaging the new finish. In these cases it is not uncommon for issues caused by trapped solution to show up sometime in the future where the barrel shoulder meets the receiver face.
One way to mitigate issues caused by trapped solution is to use compressed air after the part comes out of the parkerizing solution but before the final rinse to try to force out any remaining solution. This of course will result in a potentially dangerous spray of the solution into the air. After the water displacing oil step again use compressed air to further force oil into any crevices and hopefully displace any remaining solution.
.
The media blasting material should not be too fine. Glass beads do not perform well. I use 120 grit commercial aluminum oxide blasting media. The resulting texture has enough bite for the Parkerizing to adhere properly. Do not try to use play sand or anything like that. I found from my experience that a good medial blasted surface finish is mandatory for the best results. Good degreasing at the start is vital.
I use a media blasting cabinet, which is very handy for this and other work. If you are only going to do an occasional job adequate work can be done outside with a cheap sandblasting kit and the correct media. You can use a trash can or bucket to contain the media and allow it to be reused. If you take that route then do not skimp on protective gear. Experiment with the quality of the final finish by media blasting different sections of a junk rifle barrel with various grits. If your tank is small cut short sections off the rifle barrel and media blast each one with the different grits. Try different approaches while media blasting such as varying the distance from the media blaster nozzle to the work and how much time the metal surface is exposed to the blasting. This is also good practice for the actual work.
Parkerize the test barrel or barrel sections and see what each section looks like when it comes out of the solution. Be aware when blasting the actual parts that you are removing metal. Use a light touch and examine the work often. You can quickly blur text and imprinting on the work’s surface as well as straight edges on the work.
While not an elegant finish there is no reason a well-done parkerizing job cannot highlight the flats, sharp lines, and symmetric curves of a firearm’s shape. One way to get an idea of what the finished product will look like is to inspect it for blemishes after the part is media blasted. If any blemishes are seen all but the smallest ones will still be seen after parkerizing. Correct the blemishes and media blast again until the blemishes are gone.
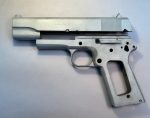
Some firearms, such as the Model 1911 pistol, use a hard slide and a softer receiver. In some cases, the parkerizing solution may react differently to the different hardnesses. This can be seen as a different darkness on the two parts. Sometimes the difference can be adjusted by varying the amount of time the part is in the solution.
 Once the firearm is disassembled, you’ll want to ensure that you remove any trace of the existing finish and make sure there are no oils or grease left on the part. Your parts must be chemically clean. Any grease or grime, including skin oil, can interfere with the bonding of the manganese to the steel. A toothbrush and Q-Tips will help get in the nooks and crannies to help with this step. A fine steel wire brush can be used to loosen up thick oil or grease. After cleaning handle your parts with a clean cotton cloth to avoid contamination. Typically, a solvent is used for the degreasing step. You can use any of chemical cleaners such as sodium triphosphate, naphtha, denatured alcohol, brake cleaner, Dicro-Clean 909, and acetone. These are widely used and work well but must be used safely and then thoroughly rinsed off.
Please note THESE ARE ALL POTENTILLY DANGEROUS! If used improperly this type of cleaner can cause irritation to the eyes, skin, and respiratory tract, headache, dizziness, nausea and vomiting. Read the Material Safety Sheet for your cleaner of choice for some eye-opening information. A minimum of good ventilation and correct personal protective gear is required.
I only use such solvents when I have to remove layers of grease. Otherwise, I use other less dangerous degreasers that usually perform well enough. My favorites are Dawn dish soap or Simple Green in hot but not boiling water. With some scrubbing with a tooth brush, paint brush, scrub brush, etc. they perform well. I use a separate tank to mix and heat these solutions.
The part must then be roughed up somewhat to get a consistent bonding between the steel and the manganese. This is best done with a media blaster, often called a sand blaster, if you have the equipment available. Blasting removes the oxides and exposes the bare steel. Personal protection equipment is required for this work to protect the eyes, lungs, and hearing.
Don’t make the mistake of thinking your media blaster will also remove grease and oils! Degrease before putting anything in the media blast cabinet. The media blast will not get all the grease and oil off the parts and the media itself will be contaminated, which will almost always result in poor finish quality. The only way to correct this is to replace the media.
If you do not have access to a media blaster then you can wire brush or use 200 grit sandpaper to rough up all the exterior surfaces of the part. Try to keep the fine lines created by these processes in parallel to each other to minimize texture variations. Pay attention to all of the tiny corners and areas such as the slide rails.
Just before you put the work in the Parkerizing solution clean them again to remove any grit left over from the media. Don’t skip this step. Put on your gloves and safety glasses.
Calculate the final amount of solution needed and put the required percentage of water in the stainless steel pot for the Parkerizing solution. Use distilled water to eliminate any issues caused my minerals in tap water. Add the parkerizing concentrate to the pot in the correct ratio.
Important Safety Note: ALWAYS ADD ACID TO WATER. Never add water to acid. Long gloves, face masks, eye protection, and a rubber apron are required. You are dealing with acid here. The final mixture should have enough mixed solution to cover the parts and then some.
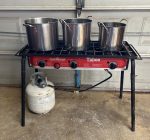 Heat the mixture up on your heat source to 180 degrees F. I use and recommend the Brownells Bluing Thermometer. For best results you need to keep the tip of the thermometer at least an inch off the bottom of the tank, one inch in from the sides, and one inch or more deep in the solution. The instructions for the concentrate used here have you put a steel wool pad into the solution for 15 minutes the first time you use the solution to condition the solution. Remove the steel wool from the solution before immersing your parts. Almost any heat source will work. The setup here uses a three-burner propane camp stove and three stainless stock pots. You can also put two pots on a two-burner stove and one pot on a second stove.
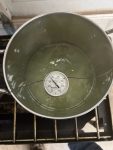
One pot will have the degreaser you use to get the part clean and up to temperature. One pot will have hot water for rinsing, and one pot will have the actual parkerizing solution.
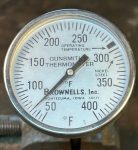 You must use an accurate thermometer in your Parkerizing tank to get the best results. I use and recommend the Brownell Bluing Thermometer. A good quality laboratory thermometer meant to work in liquids will work. Do not use a candy or kitchen thermometer. Most of these thermometers are simply not accurate or repeatable enough to work well. Use the bluing thermometer to check the solution temperature. Continually monitor the temperature and adjust the heat as needed. Keep the lid on to prevent evaporation of the solution.
It is a good practice to put your parts in a hot water (180 degree F) bath for 5 minutes or so before going into the solution to get the parts at the same temperature as the parkerizing solution. Otherwise, the cold parts will reduce the temperature of the parkerizing solution and slowing down the process. This step also helps to remove any remaining degreaser.
Use soft iron wire or stainless steel wire to suspend the parts in the solution. A test run in an empty pot is a good idea. The parts should not touch the sides or bottom of the tank. Route the iron wire through the parts such that it does not touch any exterior surfaces of the part.
The parts will immediately start fizzing when submerged. After about 5 to 10 minutes, the fizzing will stop, and the parts will have turned a nice dark color. For the small parts, use a stainless steel kitchen sieve to suspend the parts in solution and gently agitate it. The golf ball-sized Brownells #627 Small Parts Basket is great for very small parts.
After you have removed your parts from the parkerizing tank, you need to agitate and rinse them off in hot water. Remove the parts from the hot water and inspect them. Use a stiff but non marking brush to remove any sludge that has formed on the part. If you’d like, you can hit the part with compressed air to get rid of any residual water droplets.
 The parts will be completely void of any oil at this point and if left uncoated they will rust quickly. You must immediately apply some oil to them. A water displacing oil is required for this treatment. There are commercially available water displacing oils made specifically for this step. Many different oils will work. I usually use a heavy coating of WD-40 because I have it on hand, it is easy to spray into holes, and it is water-displacing. It will immediately get any remaining water out of the part. Since it is primarily a water displacing oil it does not provides much lubrication. After the part has cooled enough to handle proceed to oil the entire part liberally inside and out with a good gun oil.
I have heard of using Kroil penetrating oil as a water-displacing oil because it will seep into tiny areas to displace water, but have not tried this myself. One gunsmith I have spoken with dunks the entire part in automatic transmission fluid for this purpose. Like so many things, there are lots of opinions and options on this. You must, however, put some kind of oil on it at this stage or it will rust quickly and badly.
Parkerizing may interfere with finely fitted parts. You may wish to manually polish the disconnector hole and trigger channel in the frame as well as the inside of the combined slide stop and safety spring plunger tube. Don’t forget the mainspring housing bore.
I rotate a bore brush through the grip screw bushing holes on the 1911 frame to clean out most of the Parkerizing from the fine threads. You may wish to do this for any threaded holes. Remember that damage caused by solution caught in threads may not be visible after the firearm is reassembled.

 Be observant when reassembling and look for any binding or roughness caused by the new parkerized finish. Many semiautomatics use part of the frame as a feed ramp. You may need to repolish this area to restore the smooth surface. I use bore brushes to clean out any passageways such as the firing pin hole and the extractor hole in the slide. If the slide runs a little rough on the frame use a little fine automative lapping compound to remove the roughness and then clean up the residue.
Inspect and reassemble the firearm. Perform safety steps and function checks with dummy ammo. When all testing is complete and everything passes, then you can test fire.
Keep records and take notes on things like the objects being parkerized, the blasting media used, the resulting surface finish, the solution mix, and the temperature of the solution. The solution is reusable. But you need to track how many times the solution is used.
You can store the solution in a clearly marked plastic 5-gallon bucket with a lid. Once the solution is cool you can pour it slowly through a coffee filter placed inside a plastic funnel draining into the container. This will remove most of the sludge. The filters may clog up quickly so have some extras on hand. Use a solvent soaked rag or paper towels to wipe out the parkerizing tank. When reusing the mixture you may want to add a little of the original concentrate to freshen up the mix.
Please note that you may prefer to not save your used solution and simply start over each time you want to do a batch of Parkerizing. While not as cost-effective you should have very consistent results for each batch. In addition, you will not have to store the solution. You do have to dispose of it in a safe manner.
Used parkerizing solution is a hazardous waste. It is harmful to aquatic life and should never be poured down a drain, put in the garbage, or dumped outside. Dispose of it through an approved facility. In many localities there are once or twice yearly household hazardous waste collection days that can be utilized.
If you’d like, you can you can neutralize the solutions’ acidic properties before disposal. Use a mild base like baking soda (sodium bicarbonate) and add it slowly to the solution until it stops fizzing. This indicates the acid has been neutralized. You can get a more precise reading by using a pH test strip in the treated solution. You are looking for a neutral pH of 6 to 8. If needed, keep adding baking soda until you get the required reading.
Good luck, and stay safe.
Read the full article here