
Recently I wrote about the Elenco AM/FM radio kit and was pulled away from the build before I could do a full alignment of the radio. The kit was finished but my work took me out of town, and I wasn’t able to do a full and complete alignment of the kit per the builders manual. I should add that I am employed full-time as an electronics engineer and have been involved in electronics repair, design, and building for over 50 years. And as an amateur radio hobbiest, my experience goes further back than that timeline. My “shop” is equipped with some expensive gear and my ability to critique the kit, I believe, is valid.
In the final tuning and alignment stage of the FM section of the radio I found that the components supplied are most likely to be for the Asian (Japanese) market as the frequency response for the radio both AM as well as FM is beyond the USA standards for broadcast reception. This is at first thought not right but then I reconsidered that having an AM / FM radio that can tune below and above the normal frequency spectrum isn’t a bad thing at all … when you try to make the builders manual fit into the “properly tuned” arena for the USA and the design is made for the Japanese and Asian market is when things get funny. Once I was able to figure that out and reset the values I used for tuning up the radio, I was happy to know that my radio is able to sort of talk Japanese. Think of it as a poor man’s shortwave set.
One area of the manual of concern that may confuse a new builder, and to admit even a grumpy old man like me, is found on page 57, in figure 54. To look at that diagram and think that the coils L1 and L2 are made to mount end to end is not correct. The coils are going to be installed in series, that is electrically they will end up end to end; but physically they are not mounted so the pictorial is going to confuse some folks.
When I installed them as indicated on page 54 (Figure V) it also makes one think that they are going to be mounted end to end. That’s just the way the company chose to portray the installation. But when you look at the board where they go in, you’ll scratch you head and wonder what genius drilled out that board. If you are a first-time builder, you will do just that; and even if you’re an old hand at this, you’ll scratch your head and ask yourself what idiot wrote this manual? Thankfully I can say for myself I’m grateful it wasn’t the idiot sitting there wondering what the devil are they doing here.
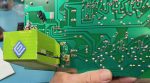
Here is a photo of the coils soldered in correctly. When I first installed them, they sat at an odd angle to the board and didn’t at all align like the drawings showed. I took them out thinking they had been wound wrong, but after careful consideration, I decided that they were in fact wound just fine; all they needed was a little tweaking.
I soldered them back in the board and then used an 11/64th inch drill bit to insert into the coils and very carefully turn them to align as seen in the photo in this update. Once they were aligned properly, I used the supplied wood spacer tool to make the spacing on L1 only by simply setting the V-shaped end of the spacer between the coils as shown in the diagram (page 57, Figure 54) and gently pushing it straight down between the coils. It is the proper space and depth for that step, and you do not need to worry much about that setting; just be careful not to make the gaps too wide. You want the tool to just slip in and out between the coil easily. If you’re like me and recall learning how to set the gap on the rotor for the distributor in your 64 Chevy six cylinder engine …. And how the feeler gauge felt when that gap was just perfect.
As for the rest of the alignment steps in the manual, I found that my initial set-up was very close; the other coils in the radio as delivered and installed were almost spot on for the radio as long as you know that the alignment is set up for the Asian radio bands. If you do as I tried to do and use the USA frequency spectrum alignment you will find that almost nothing in that manual is going to come out very well. That being said, what you will end up with is a very sensitive radio that can tune above and below the frequency spectrum for the USA. Is that bad? That will be your decision to make. The tuning dial frequency markings are not going to be worth a tinkerer’s thoughts … so what? The fact that I could pick up every FM station in our area of the interior of Alaska and most likely even most of the Pacific Coast didn’t bother me at all.
The AM band propagation is analogous to shortwave because once I took this radio out of my workshop (an all-metal building) it was able to pick up stations as far away as Mexico at night. It is very sensitive and the Automatic Gain Control (AGC) that’s built in is basically almost useless. This means that if there are powerful stations nearby then it will be difficult to tune in those distant weaker stations depending on how close they are on the bands. It also means that if there are powerful stations far away, you’ll be able to tune them in well especially if they are AM stations and its nighttime. You could hook up a long wire antenna outside and increase the signal gain if this is something you want to explore. You can just clip it to the FM antenna rod, or if it is AM you want to increase, I’d wind a wire around the AM antenna and stretch it out either inside or outside. About 20 feet of wire ought to do the trick. Longer is okay but in a difficult situation it may be hard to hide.
This radio is a good option to learn some skills in electronics, and a steppingstone to a ham license; what I realized is that it is also a great low budget SW set and if you’re using this radio in TEOTWAWKI then who cares what the frequency numbers on that dial say … it’s the news or music or information one can use for signal Intelligence that counts. The numbers on that dial are very difficult for me to read. Your eyesight may be better than mine anyway?
There is a lot to be learned from this kit: Soldering skills, parts identification, parts installation, and basic electronics theory and practical application are some of the things that this kit does provide. I hope that this article will inspire someone to learn more, gain a new skill set, and have a skill that can be currency in the hard times we are now facing. When the FRAUD (Federal Reserve Auditing Unit of Denomination) also known as dollars finally dies a very painful death and drags the whole world down with it having such “currency” as skills will be the ticket to survive and thrive in a world that we can’t begin to imagine.
 The completed kit was a surprise in how well this sensitive little radio is; I installed an ersatz echo chamber, essentially the bottom of the box attached to the back side of the speaker. I originally thought that the sound was a bit weak but adding that to the back side really made a difference. It’s an ungainly sort of echo chamber and in the process of removing it from the bottom of the box I did tear it and had to tape it together. I also found that the speaker wire prevented it from setting fully down on the PCB but just taped it over that wire as one of the little screw came up missing. My fault, becauseI dropped it, and thopught it not worth recovering.
The echo chamber does make a good difference, just try cupping your hands around your ears to increase the sensitivity of your hearing and see the effect it has, this idea in the kit is the same only in reverse. Great shades of Bose speakers … or some of the earlier Magnavox television radio combos, many of which I’ve repaired and or restored.
The kit can be built without the signal generator and oscilloscope, but having a DMM (Digital Multi-meter) is essential to verify voltages, and if needed to chase down shorts or solder bridges. I’ve listed a tool kit that has a DMM included in it and that will be more than sufficient to use in the building process. If, however, you have a ham radio friend available that has hands-on skills and equipment and is willing to mentor you this kit will provide you with a very good basic understanding of radio theory and application.
Read the full article here