
(Continued from Part 2.)
For security reasons, the Obsidian folks are pretty strict about letting you install Community plugins. You first have to go into the ‘Community Plugins’ section in ‘Options’ and turn off ‘Restricted Mode’ before you can install any plugins. Then after you install a plugin you have to verify you want to install it, and after it’s installed you have to click the ‘Enable’ slide switch to enable it.
When a core or community plugin is installed a new button will usually appear for it at the bottom of the left pane of the Options dialog. If you click on the plugin’s name under Options you can change the configuration for that plugin. If you want to learn more about what a plugin does and how to configure it you can search for the plugin’s name on the Obsidian Plugins page and click on the ‘Learn more’ button for that plugin.
I’ll be discussing how I use these plugins throughout the rest of this article.
An Item of Note
As I mentioned earlier, while the folder structure in my Obsidian vault defines where something located, individual notes are what provide information about the items stored there. For the most part each individual item that I’m inventorying has its own separate note, although for simple items I may create a single note for multiple instances. For example, if I have 20 rolls of toilet paper stored in a box I create a single note titled ‘Toilet Paper x 20’ instead of creating 20 separate notes with one note for each roll. When I take a roll out I change the title of the note to reflect the new count. However, if I have multiple identical items that might be configured or used differently I create a separate note for each. For example, if I have two Baofeng UV-5R radios stored in an ammo can I’ll create separate notes for each one – e.g. ‘Baofeng UV-5R 1’ and ‘Baofeng UV-5R 2’. I’ll also place small ‘1’ and ‘2’ label stickers on each radio to physically distinguish between them.
Creating notes is similar to creating folders – you can click the ‘New Note’ icon at the top of the left sidebar (it looks like a square with an angled pen in it) to create a note in the top level of the vault, or right-click on a folder to create a new note under that folder. I try to keep all item notes under the lowest level folders (containers), but sometimes you can’t avoid creating one higher up for larger items that may not be stored in an actual container. For example, you may have shed where you store a generator and a bunch of bins with other preps. The item note for the generator would be directly under the shed folder, along with separate sub-folders for each bin; the bin sub-folders would contain the notes for the items in each bin. Alternatively you could also create a ‘container’ sub-folder for the shed named ‘floor’ and put the generator item note under that.
When you create a new note it will be untitled and look like this:
New notes appear in the main window in edit mode – that means you can enter text to change the title and add contents. Note the icon that looks like an open book in the upper right corner – clicking on that will toggle the note to read mode. Read mode is a ‘prettier’ way to view your notes, especially if you have formatted text, but if you want to make changes to the note’s contents you’ll need to toggle edit mode on by clicking the icon that looks like a piece of paper with a pen in the upper right corner.
A basic note has two elements – a title and the content. Obsidian stores note as files in the vault, and the file has the same name as the note’s title, so there are some restrictions on titles:
- You can’t use special characters such as “, :, ;, /, , ‘, ?, etc., since most operating systems don’t allow those characters in a file name. You can use special characters that are allowed in filenames such as dashes, spaces and underscores. Don’t worry about memorizing the illegal characters – if you try to enter one when you’re typing a title Obsidian will pop up an error message.
- Since operating systems don’t allow two files with the same name in the same folder, if you try to enter a duplicate title the same folder Obsidian will automatically add an incremental number to the end of the title (e.g. ‘1’, ‘2’, ‘3’, etc.)
As I mentioned, I use tags within each note’s content to describe what type of item it is – to add a tag just type a hash sign (‘#’) and Obsidian will display a scrollable list of all defined tags as I showed in the earlier example. If you have a long list you can also start typing the first few character of the tag hierarchy and Obsidian will filter the list. For example, if you are adding a note for a new radio you can start typing ‘#Comm’ and it will filter the list to the tags that start with those letters.
If you want to add a link to another note such as one of the ‘/Information/Notes’ info notes I mentioned earlier you can type two left brackets (‘[[‘) and Obsidian will display a scrollable list of all of the notes and file attachments in your vault, and you can scroll through to find the one you want to link with. If you have a lot of things in your vault the list can be pretty long, so you can filter it by typing either the start of the folder name like ‘[[Information/Notes’ or the title of the note like ‘[[Baofeng’ and it will display a list of just the notes with titles that contain what you typed. Here’s an example where I started typing ‘[[Yaes’ – you can see the second note in the list is the info note for Yaesu VX-6R radios:

If you want to insert an attachment such as a PDF document or a picture into your note there are several ways to do so, but the most common ones are
- Copy the file using your operating system’s file explorer, then right-click in a note open in edit mode and select ‘Paste’ in the pop-up menu.
- Drag and drop the file from your OS file explorer into a note open in edit mode.
Note that both of these methods will result in Obsidian making a copy of the file in whatever Obsidian folder you specified for storing attachments (see previous discussion on attachments). If you already have a folder structure set up on your computer that stores things like user guides, pictures, etc. and you don’t want duplicate copies of those stored files in Obsidian, you can also just insert a link to an external file by holding down the ‘Ctrl’ key (‘Option’ key in MacOS) when you drag and drop the file into a note. Using external links to files can save storage space, but it has one significant disadvantage – the link may be system specific, so if you want to synchronize your Obsidian inventory vault across multiple laptops or devices the links may not work on them.
Structured Notes
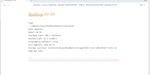
A basic note consists of just a title and some content, but there’s a third optional component available called Properties that provides a consistent method of adding metadata to notes. Properties usually appear at the top of a note right after the title in a block of text separated by 3 dashes (‘—’) at the top and bottom. Here’s an example of a note in edit mode with several different properties defined:
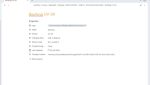
Here’s the same note in read mode – note that unlike the title and contents, note properties tend to be easier to edit in read mode:
One of the problems I found was that over a long period of time the content and layout of my notes became inconsistent, so I addressed this is through the use of templates when creating a note – a template is a predefined set of prompts that you enter values into and a nicely formatted note with properties is created. I use templates and properties to add common information about different types of items in a consistent manner. If you recall, earlier I mentioned a plugin called ‘Templater’ – that’s the tool that I used to define all of the templates in my vault. When I want to enter a new note using a template I right-click on the desired folder and select ‘%> Create new note from template’. A list of the available templates pops up and I select the appropriate one. The exact properties vary between templates, but there are a couple of common ones:
- Tag – This allows you to select the appropriate tag that categorizes the item.
- Storage Location – This field grabs the folder path of where the item is stored. If I lend/assign an item to someone by dragging it to that person’s sub-folder in ‘/Information/Assigned’, when they return it later I can look at the note and figure out where it was originally stored and put it back there. Note that if you permanently move an item’s note to a different storage location/folder you’ll need to manually update this field.
- Last Updated – The date the note was last updated.
Other templates have different pre-defined fields – for example, all templates for electronic devices have a battery type field, the Firearm template has a caliber field, etc. Some of the fields in the various templates like ‘Battery type’ in the radio template could also be put into the info note for the type of radio, but I started using templates before I came up with the idea of info notes so it’s still there. You can use whichever approach works best for you.
Creating and customizing data entry fields in templates requires a fair degree of technical expertise in things like Javascript programming, but the examples included with the download can provide a good starting point.
(To be concluded tomorrow, in Part 4.)
Read the full article here