
Author’s Note: I have been a daily SurvivalBlog reader since 2005, but this is my first article submission. I sincerely appreciate the knowledge and wisdom provided by JWR and all of the other contributors over the years.
I’ll start by stating that don’t know anyone associated with Magpul and I have not been compensated by the company in any way. I am simply a long-time customer who appreciates their consistent innovation in the firearms world. In reflecting while writing this article I was amazed by how many of their products I own and how satisfied I have been with those products. PMAGs were my first Magpul product, and I suspect that most SurvivalBlog readers own some. Magpul’s introduction of the AR-10 PMAG a few years ago cinched my decision to reposition my .308 rifles from M1As to AR-10s. The company developed the M-LOK interface that is now the de facto standard for attaching accessories to the forearms of firearms. MBUS backup sights adorn several of my rifles. Sling attachment gear and slings from Magpul are on several of my firearms, not to mention stocks and grips. I’ve given Magpul bipods as Christmas gifts to family members. I’m probably missing mentioning a few other Magpul products that I own.
A couple of years ago, my brother gave me a Hardigg rifle case that he didn’t have storage room for after he upgraded to a Pelican. In researching this article, I learned that Pelican actually acquired Hardigg in 2009 and still manufactures cases under that brand name. Hardigg cases are made using a technique called roto molding, which is less expensive than the injection molding that is used for Pelican cases. Injection molding is more expensive but creates a lighter product. Roto-molded products are heavier but excel in impact resistance.
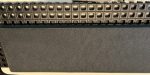
The Hardigg case (model iM3200) I received contained a traditional piece of foam that had been cut for a shotgun with a pistol grip as shown in photo 1. I wanted to have a more flexible configuration that could accommodate a variety of firearms. Magpul had just released their DAKA grid organizing system about the time I received this case. The company had kits sized for specific Pelican and Plano gun case models, but my Hardigg case didn’t conform to the measurements of any of those SKUs. I recently became aware that Magpul has a universal kit that you can cut to size for other cases, and I decided to give it a try. The universal kits will work with other brands, of course, including Harbor Freight’s Apache cases, which are an excellent value if you don’t want to pay Pelican brand prices. Just pull out the layer of pull-apart foam and you are ready to install the DAKA system.
(Photo 1 – The case as it came)
The DAKA product is made out of a closed-cell foam that won’t absorb oils or dirt like traditional gun case open-cell (“sponge”) foam does. The system is composed of grid panels that snap together, along with rigid foam blocks that insert into the grid panels, similar to how Legos work. Each grid panel is 13.25” x 9.75” x 1”.
I researched the product and installation techniques using two excellent videos on Magpul’s website. Magpul’s website offers the rifle kit for $99.95 and the long rifle kit for $119.95, plus shipping. However, Amazon had the rifle kit for $95 and the long rifle kit for $99, with free Prime shipping. The rifle kit is carbine/home defense shotgun length, and the long rifle kit is sized for full-length rifles and shotguns. Initially I was considering purchasing their standard rifle kit because it corresponded more closely to the size of my case, but decided to purchase their long rifle kit after I saw it was only $4 more on Amazon. The long rifle kit provides two additional grid panels plus additional blocks. I figured that I would probably want more blocks anyway, and the extra panels would come in handy for some other project down the road. The rifle kit comes with six panels, six double blocks, and six triple blocks. The long rifle kit comes with eight of each. Both kits also contain several Velcro straps in case you want to secure the firearm to the grid system and adhesive shims to tighten up the fit of your grid within the case.
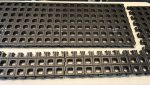
After assembling panels into the smallest possible shape that was larger than the case, I used the old foam liner to trace marks for cutting the grids down to size. (See photo 2.)
(Photo 2 – Using the old foam liner to mark your cuts)
I learned a couple of lessons in this process. First, there is a top and bottom to the grids. I assumed that they were the same, so I marked my cut lines with a silver Sharpie marker on the top side of the grids, as well as numbering my panels on the top side for reassembly into their correct positions after disassembly for making the cuts. I assumed that after making my cuts I would just flip the grid over and install it. Much to my surprise, when I flipped it I saw that the bottom is different – it has small feet. I used a black Sharpie marker to try to hide the silver markings that remained after making my cuts. Second, it is better to cut the product slightly larger than you think you will need, and then do a secondary trimming as needed to fit. The grid functions best if it is exactly the size of the interior of the case and can’t shift during travel. I wound up using some of my off-cut pieces of grid to make adjustments and then had a snug fit.
Where to make your cuts? The ideal placement of the blocks would be to have a solid “stack” of them between the side of the case and where they touch the object to be secured in the case. With kits that are made for a specific SKU (Plano and Pelican retrofit fits), the grid is proportioned so that you have a factory finished edge against all sides of the case. With my universal kit and odd-sized case, I was going to need to have at least two edges that did not have a factory finish – the edge of a row of blocks on at least two sides would have to be sacrificed. I considered whether to have partial rows around all four sides so as to equalize the gap between the blocks and the side of the case. In the end, I decided to have a factory finished edge on the hinge side of the case on the rationale that if the case was placed on the ground with the handle side up, this would be the “down” side and would most benefit from the extra support. I tried cutting using a razor knife but found that a serrated steak knife worked best with the foam.
(Photo 3 – Cuts made)

(Photo 4 – Grid installed in the case)
Next, came testing. I used a 16” barreled AR-15. The product worked great, as shown in photo 5. Magpul suggests structuring your blocks so that the firearm is not next to the edge of the case and blocks are not touching optics so as to minimize chances for changing the zero if the case receives rough handling. The compression of the foam underneath the grid and in the lid of the case made the firearm secure. I did not feel that I needed to use the Velcro straps. On a side note, it was only after inserting photo 5 into the article that I noticed that this home build sported Magpul furniture and MBUS backup sights – ironic.
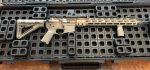
(Photo 5 – Test fit secured with blocks)
I mentioned that I thought extra grid panels might come in handy down the road. Well, it turned out that wasn’t far down the road. After I got done with the rifle case I realized that I had a smaller case that I bought for $5 at auction from my work when our IT department was surplusing old items. This smaller case was coincidentally also made by Hardigg. It had foam cut to hold some kind of large piece of IT equipment, but was basically hollow in the middle, and a firearm would have been free to shift around without major modifications to the case. The DAKA system is designed to work on top of a layer of foam and with the foam embedded in the lid of the case, so I needed a base layer of foam for this case. I happened to have a piece of pull apart foam bagged up in the garage from a previous project, so I cut/pulled apart a piece to size for this small case. After fitting the foam into the case, I set about working on DAKA grid to fit the case. Initially I hoped that I would be able to just use scrap pieces from my earlier cuts, but the case was a little too large for that. I wound up having to use the two extra panels I had as a result of ordering the long rifle kit instead of the rifle kit.
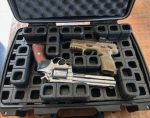
(Photo 6 – Small case bonus project)
DAKA blocks can also be used to form pockets within the case to secure things like magazines, suppressors, optics, boxes of ammunition, etc. You can also remove a grid section in the middle of your case and have a gap if you are encasing something of greater than normal width, such as a firearm with a light mounted on the side of the barrel or a bolt-action rifle with a large protruding bolt handle. Magpul sells various accessories for the DAKA system, such as a pouch that could hold NFA paperwork and bins to hold your small parts or Skittles. And of course, you can use the DAKA system for many sorts of objects other than firearms, such as bows, tools, etc.
I am happy with my purchase and recommend the DAKA organizer system to other SurvivalBlog readers. This high-quality product will give you a lot of flexibility.
Read the full article here