
(Continued from Part 4. This concludes the article.)
There are a lot of different complicated characteristics in the LoRa radio configuration that can be changed that impact range and transfer speed, so Meshtastic has defined a number of preset configurations so you don’t need to mess with the technical details. The first word of the preset defines range, and the second defines bandwidth, with ‘Long Fast’ being the default. I strongly recommend that you stick with the ‘Long Fast’ preset until you gain more experience with Meshtastic, so make sure the ‘Modem Preset’ field says ‘Long Fast’. Once you’ve selected the preset look for the ‘Frequency Slot’ field at the bottom of the same page.
While the Modem Preset defines how the LoRa radio is configured to transmit and receive, the Frequency Slot determines exactly what specific radio frequency LoRa will use. The number of frequency slots available depends on how LoRa is configured (e.g. the Modem Preset you selected) and what region you’re operating in – for example, the ‘Long Fast’ modem preset in the US has 104 frequency slots available. The Meshtastic web site has a calculator that shows you what slots are available for a given region and modem preset combination and what the actual frequency is for that slot. There are two important things to understand about frequency slots:
- All of the radios in your mesh network have to be set to the same modem preset and frequency slot in order for them to communicate with each other.
- The frequency slot of ‘0’ isn’t actually a frequency – it basically means use the default frequency slot for your region/modem preset combination. For example, in the US with a modem preset of Long Fast, the default is Slot 20, so selecting slot 0 actually sets your radio to slot 20. I recommend that you don’t use the ‘0’ default and select a random slot number for your network, or use the results from the Site Planner to select a frequency slot that provides the best coverage for your area.
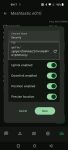
Once you’ve set everything on this page hit the left (back) arrow in the top left corner to go back to the configuration menu and select ‘User’ – this will display the user configuration page:
Recalling the earlier discussion on planning, this screen is where you set the long and short names for the device. Once you’ve entered the names you want go ahead and click the ‘Send’ button in the lower right corner – this will upload all of your changes to the connected Meshtastic device. Once the changes are uploaded the device will reboot, so you’ll need to re-connect to it like you did in the beginning. These changes (region, modem preset, frequency slot and names) are the bare minimum you should set to configure your devices. You’ve probably noticed there are a ton of other options you can configure, but those are beyond the introductory scope of this article. The Meshtastic web site has great docs on everything you can configure if you want to play around.
Channels
As I mentioned previously, channels are how you organize groups of users that want to exchange information. You can have up to 8 channels, which are numbered 0 through 7, with each channel having a unique encryption key so that only members of that channel can read and send messages using that channel. Out of the box all Meshtastic devices have a single primary default channel configured named ‘LongFast’ that uses a publicly available encryption key (‘AQ==’).
On the top right of the Meshtastic app click on the three vertical dots, select the ‘Radio configuration’ option, and in the configuration menu select ‘Channels’. The channels configuration screen will be displayed:
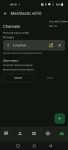
Every new Meshtastic device will automatically include a default Primary channel called ‘LongFast’, as shown in the screen above. Every device with the same LoRa modem preset and frequency slot will be able to communicate over this channel. Notice the yellow unlocked icon – this means that this channel has encryption configured using a publicly available encryption key (‘AQ==’), so everyone can see every message. Tap on the LongFast channel to edit it – I changed the name to ‘AllHands’, which also causes the app to automatically enhance encryption and generate an encryption key in the ‘PSK’ field.
Click on ‘Save’ to save your changes in the app and go back to the Channels page:
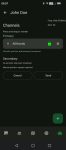
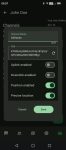
Now let’s add a secondary channel called ‘Security’ – click on the green plus sign in the lower right to bring up the add channel dialog:
I entered the channel name of ‘Security’ and the app automatically generated a new encryption key. Ignore the ‘Uplink/Downlink enabled’ options – this was an experiment I was doing, but you’ll usually want those to be disabled. You can optionally enable having Meshtastic send location data over the channel – that’s up to you. Click ‘Save’ when you’re done to go back to the Channel page. Note that at this point the new channels are only stored locally in the Android app – you need to send the new/updated channel information to the device by clicking the ‘Send’ button on the Channel page. This will upload the new channel config to your Meshtastic device.
In order to share your channel configurations, including the required encryption keys, with other devices on your mesh network, click on the Share Channels button on the bottom bar – it’s the fourth from the left and looks like a circle with some sound waves coming out of it. That’ll bring up the channel sharing screen:
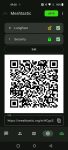
The QR code contains all of the information required for another Meshtastic app connected to a different device to connect to the channels you’ve defined. It contains the details for all channels that have a green check mark next to them, so you can check and uncheck channels depending on what channels you want to share with each user. Start the Meshtastic app on the receiving user’s mobile phone, connect it to its Meshtastic device with Bluetooth, then use a QR scanning app to scan the QR code displayed on your device – this will import the shared channel information into the other user’s Meshtastic app. Once that’s done the new user should click on ‘Send’ on the receiving unit to upload the new channels.
To send a message on a channel, click on the channels icon on the bottom bar (first one on the left – it looks like a talk balloon from a comic book), select the channel you want to send the message to, type in the text in the box at the bottom and hit the send button (right-pointing arrow). The new message will appear on all of the devices on your mesh network that have that same channel.
Odds and Ends
There are a few additional items that are useful to know about when using Meshtastic devices:
- Most Meshtastic devices have at at least one physical button, and many have two – a reset button that, as its name suggests, resets the device, and a user button that has multiple uses depending on the device. The user button typically powers the device on by pressing it and holding it down for five seconds to turn it off. The Meshtastic website has details, including button configurations, for most Meshtastic devices.
- Since tapping a button will turn on many Meshtastic devices you should be careful about how you store them – just tossing them in a bin can result in them turning on, reducing battery life. Some of the higher-end devices such as the Wio Tracker L1 Pro and Elecrow ThinkNode M1 have physical on/off switches which disconnect power, making them better options for long term storage.
- If your device has a small local screen it will usually display incoming messages without having to connect to it with your cell phone, saving time a battery power.
- Most devices can be configured to emit a beep or buzz if a new message is received.
- If you’re using GPS you can download local copies of some of the maps. In the App click on the folded map icon on the bottom bar, then click on the layers button (stacked squares) in the upper right corner – that will display a list of available maps sources (you’ll need to be connected to the Internet to initially download maps). Select each of the different options – if a button with a down arrow and a bar appears in the lower right corner it means you can download local copies of maps from this source.
Conclusion
Being able to silently send short text messages over very long distances without any supporting infrastructure can significantly enhance your communications capabilities in both short-term as well as long-term disasters. Note that I’ve only covered the minimum information required to configure your devices and send messages, which barely scratches the surface of what you can do with Meshtastic.
If you’re interested, I highly recommend spending some time with the documentation on the Meshtastic web site and reviewing some of the introductory videos on places like YouTube – the introductory series by The Comms Channel is a great way to get up to speed. There are also a number of good books available on the topic, such as ‘Meshtastic Made Simple’ by Dave Hayes, and a variety of websites where you can find a wealth of information on specific Meshtastic topics.
Read the full article here