
(Continued from Part 1. This concludes the article.)
A factor that makes it difficult for the average homeowner to do their own repair jobs is that some manufacturers design their products to be serviced solely by them and not by you. Something to look for in a product before you buy it would be to find out how easy it is to repair. Product reviews are a way of doing that. A very helpful piece of information when viewing a product’s reviews is to look for a notice on the frequency of returns; this can be a more accurate indicator of the value of the item than the customer reviews are. Before I accept a rating of a product by a magazine that does such research into consumer products I check the criteria by which they rate it. Sometimes their criteria reflect a political perspective which can skew their rating.
How about asking an online forum on how to do a repair job? Occasionally I’ve gotten some very good help there, but those forums seem to attract more wannabee comedians than experts. There are endless online videos of stupid household and automotive repair jobs and repair hacks, all of which I consider to be in the category of entertainment and not to be taken seriously. Hacks are not reliable fixes, it is a “kick the can down the road” approach that is a delay that might end up costing more later.
Back when cars had carburetors and sticky bowl floats I used to ride to work with a guy who always had a ball-peen hammer under the front seat so that when the float stuck he’d jump out of the car, usually when we were at a stoplight, to tap the bowl to unstick the float. That was not an ideal “getaway” car!
Do your homework: I once disassembled a gear reduction case of a vehicle to find out I needed a specialty tool from Germany that cost more than what the vehicle was worth. Eventually, the van was junked. I had learned to do my homework by the time I did a successful repair job on a very expensive kitchen appliance by searching numerous instructional videos online on how to repair it. This repair cost me a couple of hours and under $10 for a food-safe grease as opposed to tossing a $300 machine away, or spending who knows how much to get it repaired, even if I knew where to do that.
An intended repair job that turned into a recycling/repurpose/demolition project was a full-size recliner sofa that needed work. I had already successfully fixed a recliner chair with a similar problem, so after several repair attempts to fix it failed, I decided to dismantle it. This was an intended repair job that turned into a recycling and junking project. After getting a few dollars for the metal chassis and paying to junk the rest, I broke even.
A very common repair job that destroys wooden chests and drawers happens when someone attaches strips of wood to the bottom of the drawers with little brads that cut into the rails on the chest. The photo at left shows a chest of drawers restoration. The chest of drawers (seen laying on its side) is being restored with new rails. The drawers were also restored, without any little brads.
The age-old question: is it worth it to spend the time and money to repair an object, to replace it, find an alternative, or do without. As an example, I have a cordless homeowner chainsaw that I mostly use on camping trips to cut up deadwood for campfires that has failed. I made all the adjustments, took it apart and tested connections, switches, and the motor. I could not find the cause. I asked myself: Replace it? Do I really need it? I decided the smart thing to do was to pack my bow saw instead and put the chainsaw on the shelf for another day.
But then a chainsaw on my wishlist made by a well-known American tool manufacturer of quality products went on sale. I already had compatible batteries and a charger for it and its compact size was a big plus. Considering the importance of redundancy, availability, market instability; I decided to get it. No chainsaw? One equals none, but none equals regret. Besides, who wants to spend hours on their camping trip hand cutting wood? After all as the idiom goes, better to have it and not need it than to need it and not have it.
What if a brand new purchase is in need of repair? Should you return it or fix it yourself? It’s a risk you have to consider in the light of your abilities and the alternatives. Or convenience. There are a lot of factors involved in making that decision, like if you mess with it the warranty is void. That brand new chainsaw I just bought was leaking chain oil, which is what it is kind of supposed to do, but not from the oil reservoir cap. Return it? No. I removed the cap and felt the edge of the plastic tank and found a burr that was preventing the cap gasket from sealing. Several swipes of a file and the problem was solved. Sometimes the best approach is to be patient, stop and think. Is it really a flaw? “Don’t fix it if it ain’t broke”, but don’t think it is broken when it ain’t. But if you do have to spend time traveling to return it, you might try tinkering with it yourself if it is a minor thing.
Or maybe even if it is a major thing. A snowblower that I bought at the beginning of the snow season had problems right out of the store. I returned it and the replacement had the same identical problem. It was under warranty so I inquired about getting it serviced. This was in early November, I would have to transport it to several cities away to the warranty service center and they wouldn’t be able to get to it until the next April. Should I take it apart and try to fix it myself? That’s what I did. It turned out to be a design fault and not a manufacturing fault and I was able to modify it to make it work. It has continued to perform for 17 years afterward.

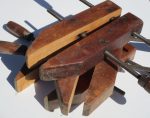 My recent wooden clamp restoration project is an example of recording a repair teardown with notes and photographs. These were a find at an estate sale, but the clamping surface was rutted from improper use.(See photo at right.) I had no other useful guide other than my own sketch made as it was taken apart, (at left) and also took photos. It looks simple, but each rod and barrel nut had to be replaced in its original location and position so that the clamp bodies would open and close uniformly. Not trusting my memory, each piece was laid out on top of the other to ensure correct reassembly as well as photographs of every step. Had I no record of how they were taken apart it would’ve taken hours more to reassemble them. The photo at the top of this article shows the clamps reassembled after the clamp body had been resurfaced.
If you’re intimidated about doing repairs, then get diligent about maintenance, buy quality products, and be a good steward of your belongings. And finally, from the book of Ecclesiastes 3:1 & 3:3b “To all there is an appointed time, even a time for every purpose under the heavens: a time to tear down, and a time to build up”. It won’t get any easier, tomorrow.
Read the full article here