(Continued from Part 3.)
Army Tent Stove Modifications
As the M1941/H-45 assembles with one half that sits on top of the lower half to make it ready to use. It can be made about 8 inches lower in height of its is assembled size for transport as one half can sit inside the other. The H-45 when assembled uses 3 nut and bolt attachment points on the outside of the stove to secure the pan to the top half. This is a worthwhile improvement as it would be possible to knock the top half off should some take a hard fall onto the stove, and knock the top half off exposing the fire inside. This would not be good. It would be better to secure the bottom to the top in a permanent way.
The ability to bolt the H-45 stove halves together, and disassemble it is one of the important advantages of the H-45. Not only for transport, but also to replace a lightly constructed grate that was placed inside as a substitute for the heavy and durable iron grate that is available for these stoves. Those are hard to find for sale. Original iron grates sold separately for the M1941 are expensive, yet available and are perhaps worth the purchase price. Certainly, if coal will be used. With a sturdy grate in place, it will last a lifetime of wood-burning service. That might be just a decade of regular seasonal use, without it.
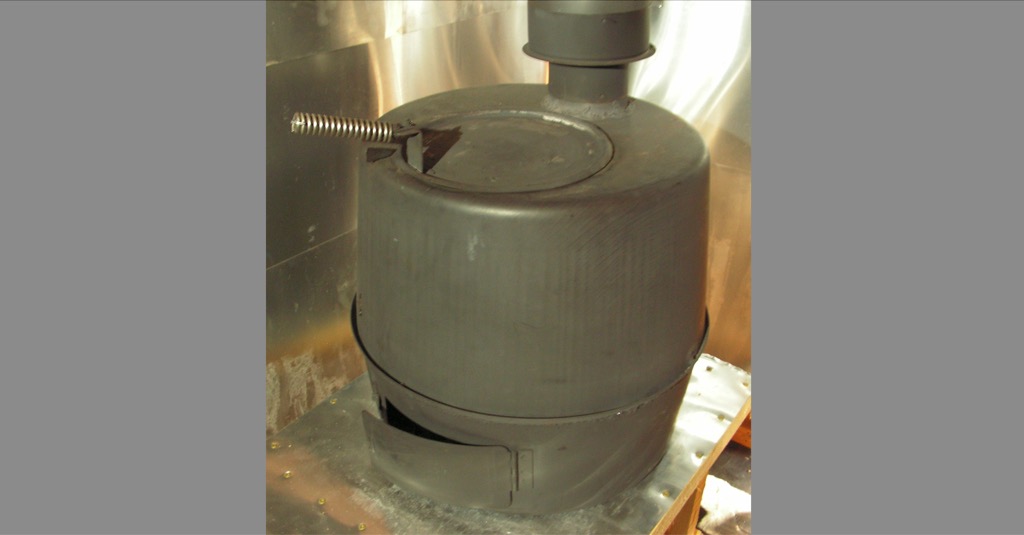
On this new-to-me M1941 that has the original cast iron grate, I decided to use a stick welder to weld several points inside the stove to secure the top onto the bottom. And while I was in there I decided to run a bead around in entire seam making the stove ‘air tight’. Use a grinder or a wire wheel mounted on a cordless drill to clean the surface so that only shiny metal remains. There must a good electrical conduction between the ground cable and the positive cable that holds the welding rod. See the photo that shows where to weld on the interior.
Several spot welds were made underneath the pan to the lower half of the stove to hold both halves together permanently. The iron grate is so robust that I do not believe it will ever need to be replaced. These welds were all it took to make the stove a solid one-piece unit. While I did more than is necessary, only spot welds, three on the inside and 3 on the outside are all that is really necessary. More would be better, however as heating and cooling over the many years of service may cause spot welds to eventually crack and fail. My welds were not pretty as I was forced to use a minimum amount of amperage due to the excessively long extension cord that causes a voltage drop in the line and increases the amperage through an old circuit breaker thereby reducing the power that could be delivered to the end of the stick welder. However, there are many of these sloppy welds and there are more than enough strong attachment points to do the job. It was quick and easy and I am not concerned with appearances, but the improved performance and the safe operation of the stove.
My first M1941 stove has been used extensively during cold months. After twelve years of burning wood, the top becoming slightly warped due to cooking pots overflowing onto the cooking surface and rapidly cooling the surface. Other than this, this M1941 shows no appreciable degradation. I expect it to be serviceable for the foreseeable future and possibly beyond my lifetime.
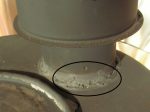 The collar where the stove pipe connects did become loose, but did not separate from the stove after five years of constant use. It was reinforced with 4 spot welds. After many years of hard use, this collar that connects the stove to the stove pipe can become loose as the metal warps, since it is simply press-fit onto the stove. This preventative measure can also be done to improve the H-45 stove that has a similar stove pipe collar connection. As a further improvement that is not necessary for the operation of these stoves, this step could be made to both types, if so desired.
Running a bead of weld all the way around the seam on the interior and then on the exterior to bottom the plate that is between the two halves make the firebox airtight. There is also an intentional ai vent hole in the lower half that can be easily closed with a nut and bolt. All welding was accomplished with an inexpensive stick welder that I purchased for just $75.
It might be less expensive to get your own stick welder and soft mild steel brazing rods no larger than 1/8 inches in diameter than it would be to take it to a fabrication shop for the same treatment. To save considerable money when taking it to a shop, just have them do 3 tack welds at the collar, 3 tack welds on the interior to the pan, and three welds on the exterior between the lower half and the pan that hold the grate and then you’d have an improved stove. The cost might only be $20.
The H-45 would only need three tack welds at the collar. The H-45 is typically found in better condition with all the original parts including the accessories that allow the stove to burn diesel or used motor oil, and it can be purchased at a lower price. However, it is much harder to find the H-45 stove with the heavy cast iron grate that is needed to burn very hot coal. This grate prevents very hot coals from burning out the bottom of the stove. Any heavy grate should be used if available. Burning wood in direct contact with the stove’s bottom will eventually burn through it. If you don’t have a proper grate then use fire brick, an ersatz grate, or sand in the bottom.
Removing Cosmoline the Easy Way
Remove the cosmoline the easy way by burning it off, outdoors. It can then be used as is or use a stiff wire brush to remove the ash and rust on the outside surface, then paint with a high-temperature paint designed for barbecues and woodstoves. The charred residue can be removed with a stiff wire brush. For the best finish possible, sand the exterior with a fine grit sandpaper on an orbital sander to remove the charred material, and then use sandpaper designed for automotive autobody work that is black in color and labeled as wet and dry 180 grit sandpaper. Sand the surface by hand with a slow-running garden hose to supply a very small amount of water to gently wash away the debris. This will make the surface smooth and dust free and ready for paint.
Simply cut the sheet of sandpaper in half and fold it to the size that best fits your hand. With a garden hose that trickles water over the work area, gently sand the surface that is wet and use the water to wash away the loose material. This is a method that is used by auto-body repair shops for preparing a vehicle for paint. No dust is produced or remains on the metal surface. Allow the surface to air dry before painting it. Use only a high-temperature paint that is rated for at least 650 degrees F. Apply several coats waiting at least 30 minutes between coats in warm dry weather. Allow the final coat to dry at least one hour before curing it by starting a fire. Then burn it hot for about an hour. The step will ensure the paint is fully cured and hardened and that there will be no off-gassing once the stove is used indoors.
This method can be used on all metal surfaces to create a high-quality paint job and a good-looking stove. All of my wood stoves are prepared for painting in this way. The Forester stove featured in my recent article was also refinished using this same technique. It quickly and completely removes all foreign material and reveals a dull metal surface that allows paint to firmly bond to the metal.
Removing Heavily Encrusted Rust
If the stove you’ve purchased has both some cosmoline and some rust, first burn off the cosmoline. If there is a thick layer of rust remaining, begin by using an orbital sander with 80 grit paper and sand it well to remove the heavy rust and any residual burnt cosmoline. Then finish by using wet and dry 180 grit sandpaper with a slow dripping garden hose that washes away the debris and leave a clean surface after the water has evaporated.
If you wish to remove all of the rust, then use phosphoric acid that is used by auto body shops and is found at automotive parts stores. Phosphoric acid will chemically transform the rusty surface into a metal that is stable. If there is only traces or a thin layer of rust remaining, simply paint the stove with several layers of stove paint. That will encapsulate the steel and the rust that remains will be insignificant and not cause the paint to flake off.
The H-45 Stove
As I mentioned in Part 1, the H-45 military stove is also recommended in Jack Lawson’s Civil Defense Manual. It is an upgraded version of the M1941 and is indeed a superior design mostly because of the nut and bolt feature that secures the upper and low halves of the stove so that the halves can not be accidentally separated. It is also a slightly larger stove that will hold more wood and burn longer. The H-45 does not however usually come with the heavy cast iron grate that must be used for burning coil. As coal is difficult to source this heavy grate is not needed and I would choose the H-45 over its predecessor, the M1941 stove. But shop for either stove based on price and availability.
Without the Grate
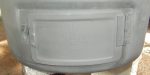 This grate is not necessary if only wood will be burned. However, it is desirable to have a heavy or any kind of grate that is 14 inches in diameter made from heavy expanded metal. Some kind of grate that can be replaced periodically should ideally be used for long-term operation as the bottom of the stove is needed to collect ash and the grate allows ample airflow from underneath is needed to generate higher temperatures and consistent performance. It can be reliably regulated by opening and closing the door attached to the bottom half of the stove. The H-45 stove has a nut and bolt arrangement that allows the halves to be secured together and of course a replacement grate can be installed by removing the fasteners that allow the halves to be separated.
For either stove, a used M1941 or H-45 does often not come with the original iron grate. If the purchase price is right, as a substitute, I would use heavy gauge expanded metal cut to fit over the 12-inch diameter hole to burn wood. In practice however, any metal grate would do. Preferably any expanded steel of heavier weight would be best as the substitute.
As a durable alternative for a stove that already has its top and bottom welded together, it would be easy to cut 14-inch long and shorter lengths of flat bar stock with a hack saw and tack weld on some 1/4 to 1-inch flat steel bar stock purchased from a local hardware store. Rebar would also work. Note that rebar is not as easily cut without a pair of bolt cutters or a gas torch to expedite the job. It will require additional time to cut it with a hack saw, but it would be worth the effort.
A small barbecue grate that is between 12 to less than 15 inches in diameter would also work. The grate is necessary to not only protect the bottom of the stove from very hot wood coals. Again, a grate makes a hotter and cleaner burning fire possible, since it allows air to enter from underneath the fire.
Fortunately, a grate is not an absolute necessity. Using the stove without a grate has the benefit of almost doubling the size of the firebox. This would be ideal for long winter nights. However, this method would require frequently emptying ashes. A more important consideration is that the floor of the stove would burn through over time by hot coals that would come into direct or close contact with the steel bottom. Running these stoves without a grate can be done. But again, the service life will be shortened.
If at all feasible, use any metal grate from either a barbecue or wire shelving from a refrigerator if nothing else is available, and however so lightly constructed and quickly consumed even a flimsy grate will extend the life of that stove.
Installation of the M1941/H-45 Tent Heater/Stove
Here are a few more photos of the stove installed for you to glean some ideas on how a close tolerance installation can be when using aluminum to reflect the radiant heat. This is a safe way, as installed and tested. To review, heat is transferred via convection, conduction, and by radiation. You can use cement board behind the aluminum flashing for additional protection and to create at minimum, 1 inch of air space. When the air behind the cement board (or another noncombustible shielding such as steel sheet metal or Hardi-backer Board) is heated the hotter air rises and draws in cool air from underneath.
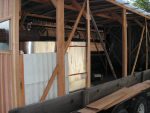
In this case, it was not necessary, but for the rear and in the corner where there are load-bearing studs. As an precaution, corrugated metal roof was installed in the corner behind the aluminum shielding and the stove is located a generous and perhaps an unnecessary 18 inches from the wall. See the photo of this structure that shows this detail from the outside before the exterior wall was in place here.
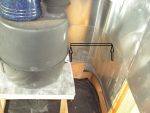 There is more than a 1-inch gap behind the flashing that allows air to flow behind and upward inside the wall. Because this trailer was custom built and designed by the author, there are no wall studs directly behind this area where there is only a 6-inch gap or space between the stove and the wall. In the corner of this area where heat can accumulate there is an additional shield that has the primary function of ensuring that hot air can travel upwards and draw cooler air up from underneath.
This installation was not performed to any industry standard or to meet a building code. But by thoroughly testing it, I’ve satisfied myself that this is a safe installation by running the stove very hot and by touching the exterior surfaces with my bare hands. None of the surfaces were hot enough to be uncomfortable to touch. The temperatures were nowhere near high enough to scorch or to cause any combustible material to ignite or to cause a partial thickness burn to my hand. Subjectively, the surfaces were not much more than body temperature. The test was performed during summertime temperatures.
During cooler weather when the stove would be used, surface temperatures behind the stove would be considerably less as the cold outside air would more quickly draw away the heat energy in the structure. This is how one can become convinced that aluminum shielding is highly effective as a heat barrier. This installation is inside the Bugout Trailer that was the subject of an earlier article.
The area and ceiling immediately near, around and above the stove is protected by aluminum roof flashing that was discussed in another and yet earlier article found here: How to Install a Woodstove in an RV or Small Cabin.
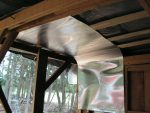 This next pair of photos shows the air gap above the stove. This shield was again
  aluminum roof flashing. It is important that in the event that there is a grease fire, or should the stove pipe fail, that the ceiling is protected from the flames. Aluminum reflects about 95% of the radiant heat whereas steel and many other materials absorb radiant heat and become very hot, hot enough to be dangerous unless the stove is installed upwards of 18 inches from a flammable surface. Where it was possible to install the stove further away from the wall this was done to assist the area with as much airflow to air that is very close to the wall than measures at the closest point to the circumference of the stove that is only 6 inches away.
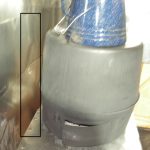 This photo shows the closest point between the stove and the aluminum flashing. Note that this stove is round and that a rectangular stove could not safely be installed so closely. There is ample space and the area surrounding the stove can easily circulate and prevent significant heating of the wall, via convection.
(To be concluded tomorrow, in Part 5.)
Read the full article here