
We bought undeveloped land in rural Alaska, in a region with no municipal infrastructure within a 20-minute flight to the nearest community. So, we built everything from scratch, after we hauled all the requisite supplies in by snowmobile trailer or by float plane. We made many mistakes in our design and construction, as well as a few good decisions. I actually think that people who buy a property that has an old-timer’s cabin, layout, and tools, may have an advantage in making future adjustments. The following are my suggestions for considering how to build and design property in a remote area that has no grid-based resources. My priorities are efficiency, low maintenance, and low power usage.
Water
Natural sources: The most important resource is, of course water. If your property has a lake, pond, creek, or river, you can certainly make good use of these natural sources for irrigation and washing. Otherwise, or in addition to these wild sources, you will likely dig a well. Either way, you will want to invest some sort of filtration system, whether homemade, simple, or complicated and expensive. We utilize a series of three increasingly fine filters that we screw into our sink and wash house plumbing. For water that came from the lake, we needed to change out the filters three times a year. For water coming from our well, we still need to replace filters twice a year. Even with the filters, we clean out the sticky silt that coats hoses and storage drums twice a year.
For convenience, I heartily recommend that you plan a lot of your property layout around your water source. We did not, and that cost us more money, more problems, and more ongoing effort. (See below).
Some counties have set-back rules regarding how close to water one can construct buildings or dig wells. This is true even in remote areas, and it is especially important along rivers, where channels can shift or overflow, eroding the shoreline. One section of the Matanuska River in Alaska has eroded hundreds of feet, pitching entire homes into the widening river. Research these rules and river course histories before you buy and build! In our borough (that is the Alaskan term for counties), our construction distance is grandfathered, but future builders in the area will have to be much farther back from water sources, varying from 75 to 150 feet. This information would influence not only where you place your buildings but how large a parcel you need to accomplish your goals.
The height of your water table, the type of soil, and the depth of permafrost (if you live up north) are very important to construction. Ask such questions before you buy a property in an area that you do not know well. Imprudent locations can buckle buildings unless you sink sonatubes or other supports down to reliably sturdy surfaces.
In our case, for water, we relied for three years on a gas-powered lake pump and several filters, even for potable water… in the summer, and melting snow in the winter. That got old. Our Berkey water filter never worked as fast as advertised, perhaps because of the particulate matter in our lake water. We gave it away. Initially, we used a solar-powered lake pump. It was effective… on sunny days. We still use a gasoline-powered lake pump to irrigate the gardens and fruit bushes closest to the lake and for fire protection. However, writing this article caused my husband and me to think about that lightweight solar-powered pump that we used ten years ago. We will dig it out from the crawl space under the shower house and see if it still works! Thanks for the reminder and inspiration!
In terms of irrigation, I made a mistake in locating several gardens and the greenhouse. (Our greenhouse is pictured at left.) The good news is that they are in the flattest, sunniest part of the property. The bad news is that they are 450 feet uphill from the lake. This means that once a month we have to lay out many feet of connected, heavy hoses to fill 200 gallons of water drums. On those days, I soak the greenhouse garden and turn sprinklers on the raspberry hedges and outside gardens. Then we have to roll up all those hoses so our ATV will not drive over them. It is a bother. To mitigate part of this inconvenience, I tore out and repositioned two gardens. The uphill gardens are now mostly for perennial and low-maintenance vegetables, like rhubarb, asparagus, potatoes and brassicas. The downhill gardens feature fast-growing, thirsty, and daily use plants, like herbs, peas, beans, and lettuces.
Another mistake was that I planted a few domesticated berry plants and apple saplings in locations removed from anything else I water, so I neglected them when everything was growing so fast and needed attention. Those gooseberries and apple trees died, but the currants are so hardy that they thrive wherever they are. I love those plants! A better design would have been to position gardens and domesticated fruit bushes/trees closer together and closer to a water source. (But my goal at the time was to test various soil and drainage areas to see which ones worked best. Duh! Paying attention is important, too!)
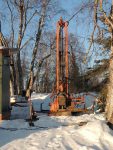 Well water: Depending on how high your water table is, you may be able to dig a sandpoint well with a backhoe or human labor. The derelict lodge on our lake used a sandpoint for many years to service several guest cabins. These are easy and cheap to dig, but the water needs to be filtered or to sit in a jug for the sand and silt to settle before you drink it. Alternatively, you can have a deeper well professionally dug. We paid $12,000 for a 61-foot-deep well. In your intended location, ask how deep the wells are. In recent years, I have heard a price of $100 per foot, but we paid double because of the expense and time of moving equipment to our remote location. The heavy equipment (see photo at right) was shuttled out here by snowmachine across many miles of frozen rivers and bogs. Our water tastes great, but one friend had to dig a second well because the water from his first one tasted like sulfur. Well diggers don’t guarantee the water flavor.
Whichever type of well you plan, I recommend that you determine its location first and then construct a water – fed structure (like your home or wash house) either adjacent to or actually over the well, especially in cold climates. This reduces the length of the pipes, and the warmth of a heated home or other structure can protect and heat any exposed pipes that come out of the ground and into your home or wash house.
Unfortunately, we built our dry cabin first (no plumbing) in a pretty “lake and mountain view” location without thinking about anything else. Then, several years later, we hired a company that picked a spot for the well near our wash house, about 70 feet from our cabin. As a result, we have a long expanse of pipes underground. Unfortunately, we did not dig the trench deep enough to really protect the pipes (below the permafrost line – about 3 feet deep here), so we paid $1,000 to insert heat tape into the pipe to make sure no residual water in the pipe freezes, but, like any heat producing item, it draws a lot of power, so it is not on full time. About three times in the first five years, spigots or pipes cracked here and there, and, of course, we could not fix them in the freezing weather. So, instead of trusting the pipes in winter, we jerry-rigged a seasonal water system.
For indoor water, we fill a 50-gallon drum with cold water and route it to the sink spigot with a 12 volt DC RV pump. Hot water is maintained in a 23-gallon hot water tank on top of the woodstove. I access that for washing with a spigot and short hose to fill wash bins that I then place in the sink. Since the drain pipe from the sink freezes in the winter, we have a short heat trace line that I turn on for a few minutes above a temperature of -10 degrees F. Below that, the line requires too much time and power to thaw the drain, so I wash dishes in a bucket instead of in the sink.
Once a week when the temperature is below +20 F (from November 1 to March 15), my husband hauls a sled load of 5-gallon jugs of water from the well to the house. When temperatures are between +20 to + 33, we lay a hose across the yard and into the house. Why the difference? Reliable temperatures above 32 mean that we can return to the on-demand heater for piped water. Will we ever dig up the pipes and rebury them? I don’t know. We have gotten used to this system over more than a decade, but if we had thought this through, we would be better off.
Gray and black water: Another issue to take seriously is where to place your outhouse in relation to a well or wild water source. For obvious reasons, you don’t want the former uphill of and close to the latter. Maybe you invest $1,800 for a composting toilet, but that requires power that you need to provide in an off-grid location. Maybe you DIY a sawdust toilet for solid waste and a bucket for liquid waste. We have two outhouses and an indoor commode (a Home Depot bucket with a [Luggable Loo] toilet seat on top) which I tuck under a bookcase upstairs for midnight usage.) In the morning, I dump any solid contents into the outhouse pit and we use an ice spade to cut down the stalagmite that forms during winter months. I toss the liquid contents into the snow off the back deck. In the summer, I can dilute urine and toss it into the yard. Since we take no medicines, the diluted urine is not detrimental to the yard.
At off-grid properties accessible by road, owners can hire heavy equipment to dig a hole and plop in a septic tank system, that has to be sucked out from time to time. Since our cabin is off-road, we do not have that luxury. Since we have outhouses rather than toilets, we do not have to dispose of black water other than in the outhouse pits. For gray water, we sank perforated 55-gallon drums under the shower house and kitchen sink, with PVC pipe that leads downhill to a low meadow hemmed in from the lake by a naturally raised berm of rocky land. Occasionally, curious bears visit and sniff and carry off something nearby, like a piece of plywood.
(To be concluded tomorrow, in Part 2.)
Read the full article here